Leaf Lee

Alocasia vs Colocasia

Alocasia vs Colocasia: A Complete Comparison for Plant Lovers Alocasia and Colocasia are two popular plant genera often confused due to their similar aesthetic appeal and tropical origin. Commonly called “Elephant Ears,” both plants add dramatic flair to gardens and indoor spaces. However, they differ in terms of care, appearance, and suitability for different living situations. In this article, we’ll explore the key differences and similarities between Alocasia and Colocasia to help you determine which one is right for your space and lifestyle. Overview of Alocasia Alocasia is well-known for its sculptural beauty and architectural presence in both indoor and outdoor settings. It is typically grown as a houseplant in cooler climates but thrives outdoors in USDA zones 9-11. Overview of Colocasia Colocasia, commonly called Taro, is not just ornamental—its edible roots are a dietary staple in many tropical countries. It grows best outdoors in warm, humid regions but can also be grown indoors with the proper conditions. Care Comparison: Alocasia vs Colocasia Care Factor Alocasia Colocasia Light Bright, indirect light; avoids direct sun exposure Full sun to partial shade; tolerates more direct sunlight Water Keep consistently moist but not soggy Loves wet conditions; even grows well in standing water Humidity High humidity needed (60%+) Thrives in high humidity but more tolerant of moderate levels Soil Well-draining, chunky potting mix Moist, rich, and heavy soil (can tolerate clay) Difficulty Moderate to high; sensitive to changes Moderate; generally more adaptable Growth Behavior and Space Requirements Alocasia tends to grow in an upright, vertical form which makes it suitable as a statement piece in corners or narrow spots. It is generally a slower grower and doesn’t spread aggressively. Colocasia, on the other hand, has a clumping or spreading habit, especially outdoors. It can grow very wide and tall—up to 6 feet in each direction—requiring substantial space. Some Colocasia cultivars produce ‘runners’ and multiply quickly, making them better suited for gardens or large outdoor containers. Toxicity and Pet Safety Both Alocasia and Colocasia are toxic to pets and humans if ingested. They contain calcium oxalate crystals, which can cause severe irritation of the mouth and digestive tract (ASCPA, 2023). It’s essential to keep them out of reach from curious pets and young children. Pros and Cons Alocasia Colocasia Real-life Suitability Conclusion: Which Plant is Right for You? Choosing between Alocasia and Colocasia ultimately depends on your environment and personal preference. If you’re an experienced plant parent looking to add a striking indoor houseplant and are willing to cater to humidity and watering needs, Alocasia is your best bet. If you’re after a dramatic, easy-to-grow outdoor plant or garden centerpiece and have space to spare, Colocasia offers reliable, vigorous growth. For pet owners, neither plant is ideal, but keeping them out of reach can mitigate risks. Beginners or those seeking lower-maintenance foliage should consider Colocasia varieties that can thrive outdoors with minimal fuss. However, for those who want to enjoy tropical elegance indoors, Alocasia is a rewarding (if sometimes fussy) companion. References

Alocasia vs Colocasia Read More »

epipremnum aureum njoy

Epipremnum aureum ‘Njoy’

Epipremnum aureum ‘Njoy’: A Guide to Growing This Stylish Variegated Vine Indoors Epipremnum aureum ‘Njoy’, pronounced “Enjoy”, is a captivating variegated cultivar of the common pothos, beloved by houseplant enthusiasts for its compact growth and eye-catching white and green foliage. Perfect for beginners and experienced indoor gardeners alike, ‘Njoy’ is low-maintenance yet offers rewarding lushness when grown under the right conditions. In this care guide, we’ll explore everything you need to know about growing Epipremnum aureum ‘Njoy’ indoors—lighting in lux, watering schedules, temperature and humidity needs, common issues, and more. Whether you’ve just picked up this plant or are considering adding it to your collection, this post will set you up for success. Background and Botanical Overview Botanical Classification: Botanical name: Epipremnum aureum ‘Njoy’ Family: Araceae (Arum family) Origin and History: Originally discovered as a natural mutation of Epipremnum aureum (commonly known as golden pothos) in India, ‘Njoy’ was selectively cultivated for its striking white-and-green variegation and smaller leaves compared to its parent plant. Unlike wild Epipremnum aureum, which is native to the understories of tropical forests in French Polynesia, ‘Njoy’ is a cultivated hybrid, not found in the wild. The parent species, E. aureum, was previously known under various synonyms including Scindapsus aureus and Pothos aureus, and has become a staple of interior plant design due to its tolerance for a wide variety of growing conditions. Lighting Requirements (Measured in Lux) Light is arguably the most critical factor for the variegation and overall health of your ‘Njoy’. This variety has less chlorophyll due to its white variegation, so it requires more light than non-variegated pothos to photosynthesize efficiently. Recommended Lighting Ranges: Optimal growth: 10,000–20,000 lux (bright indirect light, east- or west-facing window) Sufficient for survival with slow growth: 5,000–10,000 lux Minimal survival threshold: 2,500–4,000 lux (expect leggy and pale growth) Grow Lights: If your home doesn’t meet the above lux levels, supplemental lighting through full-spectrum LED grow lights is highly effective. A 20W LED panel placed about 30 cm (12 inches) above the plant can provide around 10,000 lux—ideal for compact, healthy foliage. Watering: Frequency and Factors Unlike succulents, Epipremnum ‘Njoy’ enjoys moderately moist soil but is susceptible to root rot from overwatering. Here’s how to water properly by observing environmental conditions: General Watering Guidelines: Spring–Summer (active growth): every 7–10 days Fall–Winter (dormant season): every 14–21 days Adjust Based On: Pot size: Smaller pots (10–15 cm) dry faster — may need watering every 5–7 days in warm conditions. Humidity: Lower humidity increases evaporation. If RH < 40%, check soil more frequently. Soil type: Use a well-draining mix with 50% perlite or orchid bark to prevent waterlogging. How to Water: Insert your finger up to the first knuckle — water only if the top 2–3 cm of soil feels dry. Water deeply until excess drains — never let the pot sit in water. Temperature and Humidity Epipremnum aureum ‘Njoy’ thrives in warm, humid environments but can adapt to standard indoor conditions if extremes are avoided. Temperature Range: Optimal: 18–29°C (64–85°F) Minimum survival: 10°C (50°F) — prolonged exposure may result in leaf drop Relative Humidity (RH): Ideal: 50%–70% Minimum: 40% If your home’s humidity drops in winter, consider grouping plants together, using a pebble tray, or running a humidifier. Common Problems and Solutions 1. Brown Leaf Tips Cause: Low humidity or salt buildup Fix: Increase humidity; flush soil monthly with distilled water to remove salts. 2. Yellow Leaves Cause: Overwatering or poor drainage Fix: Let soil dry between waterings; ensure pot has drainage holes and a fast-draining soil mix. 3. Leggy Growth Cause: Insufficient light (

Epipremnum aureum ‘Njoy’ Read More »

cgxhbnqtzgitcghvdg9zl3boawxfymlya2luxy5qcgc=

Philodendron birkin

Meet the Philodendron Birkin: A Striking Ornamental Hybrid The Philodendron ‘Birkin’ is a captivating hybrid cultivar prized for its creamy-white pinstriped foliage and compact growth habit. As part of the Araceae family, this decorative indoor plant is ideal for beginners and plant enthusiasts who love stylish, low-maintenance greenery. Originating from the rich biodiversity of tropical South America, Philodendrons have been cultivated for decades due to their adaptability and aesthetic appeal. ‘Birkin’ is not a wild species but a spontaneous mutation of Philodendron ‘Rojo Congo’, itself a hybrid involving P. erubescens in its lineage. First recognized by plant collectors in the early 2000s, the Birkin gained popularity for its variegated foliage pattern which can revert or shift over time, offering an evolving visual interest throughout the plant’s life. Lighting Requirements for Philodendron Birkin Proper lighting is essential to maintain the vivid striped pattern of the Birkin’s leaves. While adaptable, this plant thrives best within specific light intensity levels measured in lux. Ideal Light Intensity Ranges Optimal Growth: 5,000–10,000 lux (bright, indirect light from east or north-facing windows, or filtered light through sheer curtains) Acceptable Range: 2,500–5,000 lux (moderate ambient indoor light, such as setting back from a west-facing window) Minimum Survival Level: 800–2,000 lux (low indoor light, often found in corners or rooms with minimal natural sunlight; leaf variegation may fade) If natural light is insufficient, especially during winter or in rooms with poor window access, full spectrum LED grow lights rated around 3,000–5,000 lumens and 5,000–6,500K color temperature can effectively supplement light needs. Position lights 20–30 cm (8–12 inches) above the foliage for best results, running them 12–14 hours per day. Watering Guidelines: Tailoring Frequency to Season, Pot, and Humidity Overwatering is one of the most common mistakes with Philodendron Birkin. It prefers evenly moist but not soggy soil. Consider the following while planning your watering routine: Factors That Impact Watering Frequency Seasonal Changes: Spring/Summer: Water approximately once every 7–10 days Fall/Winter: Reduce to every 14–21 days, allowing the top 2–3 cm (1 inch) of soil to dry out Pot Size and Material: Smaller pots dry faster and may need more frequent watering Terracotta pots wick away moisture faster than plastic or ceramic containers Humidity: In high-humidity environments (above 65%), soil stays moist longer—extend watering intervals to prevent root rot. Watering Tip: Always check the soil before watering. Insert your finger 2–3 cm deep; if it feels dry at that depth, it’s time to water. Never let the pot sit in stagnant water—drain any excess. Temperature and Humidity Preferences Being a tropical plant, Philodendron Birkin prefers warm and humid growing conditions similar to its native South American rainforest origins. Optimal Environmental Ranges Temperature: 18–27°C (65–80°F) — avoid sudden drops below 15°C (59°F) Humidity: 50–70% is ideal. Minimum is around 40%, though higher is better to prevent leaf crisping. If household humidity drops during winter months, consider placement near a humidifier or a pebble tray filled with water beneath the pot. Grouping plants together can also help maintain higher localized humidity. Common Problems and How to Fix Them 1. Yellowing Leaves This often results from overwatering or poor drainage. Ensure the pot has drainage holes and reduce watering frequency. Repot in well-draining mix with perlite or orchid bark if soil remains wet too long. 2. Browning Leaf Tips or Margins Cause: Low humidity or salt buildup from hard tap water Solution: Increase humidity and water with filtered or distilled water periodically 3. Loss of Variegation Cause: Low light conditions Solution: Move plant closer to a light source or supplement with a grow light providing 5,000–10,000 lux 4. Stunted Growth Cause: Nutrient deficiency or low light Solution: Use a balanced, water-soluble fertilizer (e.g., NPK 20-20-20) monthly during growing season and ensure adequate light exposure Safety Notes: Is Philodendron Birkin Toxic? Yes, all species in the Philodendron genus, including ‘Birkin,’ are toxic to humans and pets if ingested. The plant contains calcium oxalate crystals, which can cause: Oral irritation or burning sensation Swelling of the lips, mouth, or tongue Vomiting or difficulty swallowing (in severe cases) Keep the plant out of reach of curious children and pets like cats or dogs. Always wash hands after handling or pruning. Useful Real-Life Care Tips 1. Rotate Regularly To promote balanced growth and prevent lopsided foliage, rotate your Philodendron Birkin 90° every two weeks. 2. Choose the Right Potting Mix Use a well-aerated, chunky mix composed of: 40% peat or coco coir 30% perlite 20% orchid bark 10% activated charcoal (optional for odor control) 3. Prune Resets and Reversions Sometimes the Birkin reverts back to solid green or red foliage (a throwback to its ‘Rojo Congo’ parent). If this happens, prune off fully reverted stems to encourage new variegated growth. 4. Clean the Leaves Dust can clog the pores of the plant and reduce photosynthetic efficiency. Gently wipe leaves with a damp microfiber cloth every 2–4 weeks to keep them clean and glossy. 5. Repot Every 12–18 Months Philodendron Birkin enjoys a slightly snug pot. However, once roots start circling the bottom or poking through drainage holes, it’s time to repot into a container 2–3 cm (1 inch) larger in diameter. Conclusion: Is Philodendron Birkin the Right Plant for You? If you’re an indoor gardener looking for a visually impressive yet low-maintenance tropical houseplant, Philodendron Birkin is an excellent choice. Its compact size (typically growing up to 50 cm/20 in. tall) and striking variegation make it a standout addition to desks, shelves, or plant stands. By providing adequate light (ideally 5,000–10,000 lux), consistent moisture, and tropical-level humidity, you’ll enjoy a vibrant, healthy plant that evolves uniquely over time. Just remember to keep it out of reach from pets and small children, and periodically wipe those bold leaves! References Gilman, E. F., & Watson, D. G. (1994). Philodendron spp. Fact Sheet ST-488. University of Florida Institute of Food and Agricultural Sciences. Retrieved from https://hort.ifas.ufl.edu Royal Horticultural Society. (n.d.). Philodendron ‘Birkin’. RHS Plant Finder. Retrieved from https://www.rhs.org.uk/plants Missouri Botanical Garden. (n.d.). Philodendron. MBG Plant Finder. Retrieved from

Philodendron birkin Read More »

aglaonema pictum tricolor specimen

Aglaonema pictum tricolor

Introduction If you’re a fan of striking foliage and unique houseplants, Aglaonema pictum tricolor might just be the crown jewel of your indoor garden. Commonly known as the “camouflage plant” due to its stunning variegated leaves, this rare tropical beauty is prized by collectors and beginner hobbyists alike. In this comprehensive care guide, we’ll explore everything you need to know about Aglaonema pictum tricolor, from its botanical background to practical, science-backed care tips. Whether you’re just starting with indoor plants or looking to refine your existing setup, you’ll find actionable insights on lighting (measured in lux), watering, humidity, and more. Botanical Background Scientific Classification and Origin Botanical name: Aglaonema pictum tricolor Family: Araceae (Aroid family) Native range: Highland rainforests of Sumatra and other parts of Indonesia Type: Wild species with natural variegation, not a hybrid This species was first described in the botanical records during 19th-century explorations of tropical Asia. Its military-camouflage pattern of three shades of green has made it a sought-after ornamental species in both botanical gardens and private collections worldwide. Lighting Conditions (Measured in Lux) Aglaonema pictum tricolor prefers moderate, consistent lighting and can suffer under excessive brightness or deep shade. Here’s how to dial in the perfect light levels: Ideal Light Intensity Optimal: 4,000–6,000 lux (bright indirect light) Borderline low-light tolerance: 2,000–3,000 lux – expect slower growth and reduced variegation Minimum survival threshold: ~1,000 lux – survival possible but with potential legginess or yellowing Direct sun (>10,000 lux), especially for extended periods, can scorch the delicate foliage. Ideally, place the plant near an east-facing window with filtered light or a few feet back from a south- or west-facing window. Grow Lights Grow lights are extremely helpful if natural light is insufficient. Use full-spectrum LED grow lights rated between 2,000–4,000 lux during a 10–12 hour on/off cycle. Be sure to position the light about 12–18 inches above the plant for best results. Watering Schedule by Season and Conditions This plant prefers moderately moist soil but is sensitive to overwatering due to its natural growth in well-draining forest floor habitats. Watering Frequency Spring/Summer (Active Growth): Water every 7–10 days, or when the top 3–4 cm of soil feels dry. Autumn/Winter (Dormancy): Water every 14–18 days, depending on light and heating conditions. Other Factors Influencing Water Needs: Pot size: Small (≤10 cm diameter) pots dry out faster — check moisture every 5–7 days Humidity: High humidity (above 70%) slows soil drying — adjust watering intervals accordingly Container material: Terra cotta dries out faster than plastic or ceramic pots Always drain excess water and avoid letting the plant sit in a saucer of water. Root rot is a common killer of this species in cultivation. Temperature and Humidity Ranges Ideal Range Temperature: 18–27°C (64–81°F) Humidity: 60–80% Aglaonema pictum tricolor thrives in the warm, moist air similar to its native rainforests. While it tolerates average room humidity (>45%), growth is noticeably better at levels above 60%, especially during winter when indoor heating dries the air. Consider using a humidifier or pebble tray for increased humidity. Minimum Tolerance Temperature: 15°C (59°F) – lower levels can stress the plant or cause leaf damage Humidity: Below 40% – may lead to crisping leaf edges or slowed growth Common Problems and Solutions Although generally easy-going, this plant can present a few challenges. Here’s how to troubleshoot them: Yellowing Leaves Cause: Overwatering or poor drainage Solution: Check soil moisture with a moisture meter (aim for readings of 3–4 on a 10-point scale before watering). Ensure the potting mix includes perlite and orchid bark for aeration. Root Rot Cause: Prolonged saturation of soil Solution: Remove plant, trim off mushy or black roots, and repot in fresh, sterile substrate with better drainage. Use a pot with drainage holes only. Browning Leaf Tips Cause: Low humidity or salt build-up from tap water Solution: Increase ambient humidity and use filtered or rainwater for irrigation. Faded Leaf Variegation Cause: Inadequate light Solution: Move the plant closer to a bright, filtered light source (~4,000–6,000 lux) or install a grow light. Pest Alerts Mealybugs: Look for cottony masses on stems and leaf axils Spider mites: Fine webbing and stippled foliage Treat infestations with insecticidal soap or neem oil, and improve air movement to discourage pests. Safety Notes Aglaonema pictum tricolor, like others in the Araceae family, contains calcium oxalate crystals. This substance is toxic if ingested by pets or humans, and can cause irritation to the mouth, throat, and digestive tract. Safety Tips: Keep the plant out of reach of pets and young children Wear gloves when pruning or repotting to avoid skin irritation If ingested, seek veterinary or medical help immediately Real-Life Plant Care Tricks Success with this plant often comes down to consistency and attention to microclimate. Here’s what experienced growers recommend based on tested routines: Use a hygrometer: Monitor room humidity near your plant — digital hygrometers are inexpensive and reliable. Rotate weekly: Turn the pot a quarter turn weekly to ensure even growth and light exposure. Surface mulch: Add a thin layer of orchid bark or sphagnum moss to maintain surface humidity and soil moisture without rot. Flush the soil: Every 4–6 weeks, water deeply and allow it to fully drain to remove accumulated salts. Cover for humidity: In low-humidity homes, place the plant inside a glass cabinet or plastic storage tote that’s been converted into a DIY greenhouse. Conclusion Aglaonema pictum tricolor is more than just a showpiece—it’s a living slice of the Sumatran cloud forest that can thrive in your home with the right care. By providing proper lighting (4,000–6,000 lux), managing watering carefully based on season and environmental factors, and maintaining warmth and humidity, you’ll be rewarded with lush, camouflaged foliage year-round. Attention to detail helps this rare plant flourish, but don’t be intimidated—it’s surprisingly forgiving once established. With this guide as your reference, even beginner gardeners can confidently grow and enjoy one of the world’s most captivating aroids. References Boyce, P. C. (2009). The genus Aglaonema Schott (Araceae: Aglaonemateae) in Peninsular Malaysia, including a

Aglaonema pictum tricolor Read More »

gt 21 71454cc4 f0b2 42a4 a257 c997b72db76c

Anthurium clarinervium

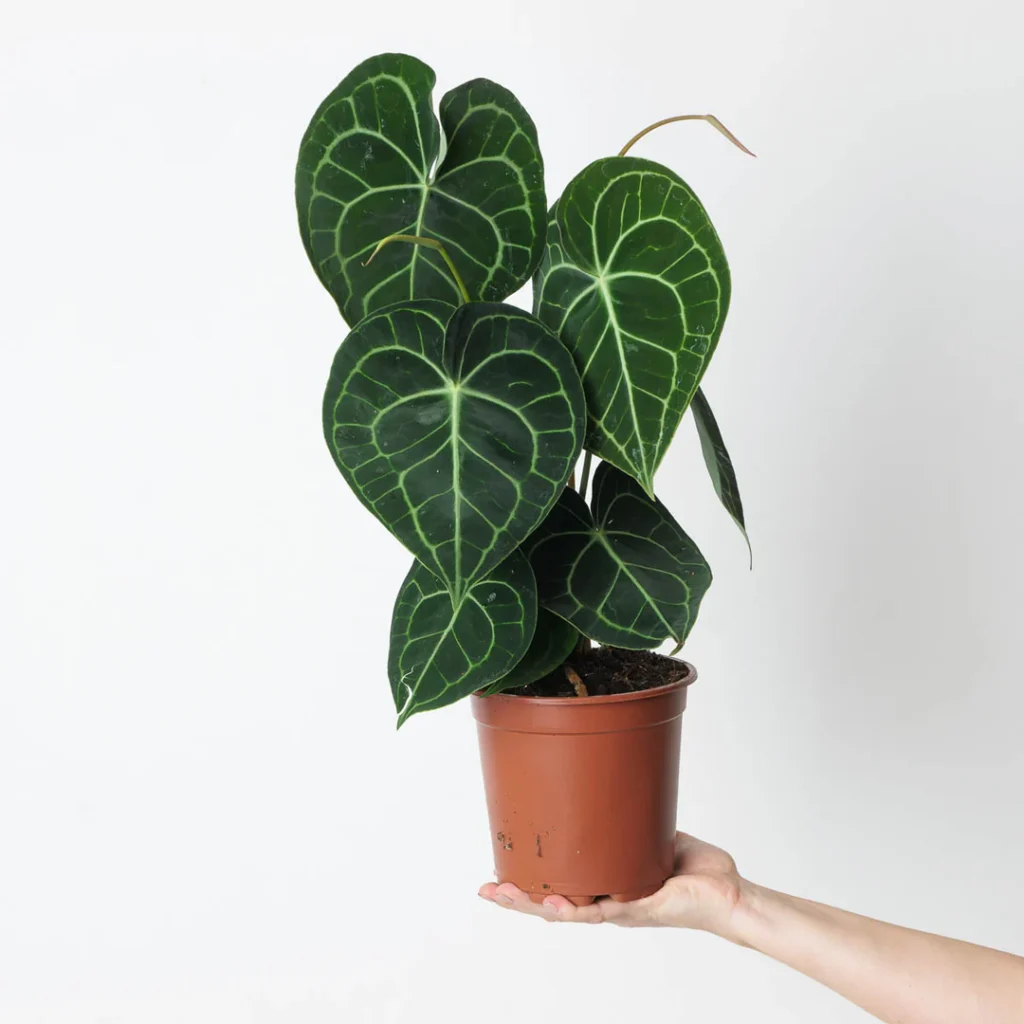
Introduction If you’re searching for a visually striking houseplant that brings an exotic jungle feel to your indoor space, Anthurium clarinervium may be the perfect choice. Known for its velvety, dark green leaves and bold, white venation, this plant has taken the plant-loving world by storm. But don’t let its tropical looks intimidate you — with the proper care and clear guidance, even beginner gardeners can successfully grow this compact beauty. In this comprehensive guide, we’ll explore everything you need to know about growing Anthurium clarinervium indoors, including ideal lighting levels in lux, watering practices tied to climate and container size, temperature and humidity needs, common care issues, and more. Meet Anthurium clarinervium Botanical Background Botanical name: Anthurium clarinervium Family: Araceae Native range: Limestone grottos and tropical forests of Chiapas, southern Mexico Discovery and cultivation: First described in the mid-20th century, A. clarinervium is a true wild species, not a hybrid. It has become a staple in ornamental horticulture due to its dramatic foliage and manageable size. Foliage Appeal The heart-shaped leaves are thick and velvety, with an almost suede-like texture. The white to silvery venation contrasts strikingly against the deep green foliage, making this plant a favorite for collectors and interior decorators. Lighting Requirements in Lux Understanding light in measurable terms is essential for successful care. Anthurium clarinervium naturally grows in filtered light under forest canopies, making it a low-to-medium light plant. Here’s how to translate that into indoor conditions: Optimal range: 8,000–15,000 lux – Bright, indirect light; near an east or north-facing window, or a filtered south window. Acceptable range: 5,000–8,000 lux – Lower light levels are tolerated, but growth may slow. Minimum for survival: 2,000 lux – The plant may survive for a time but will lose vibrancy and become leggy. Too bright: 20,000 lux and above – Direct mid-day sunlight will scorch the velvety leaves. Can You Use Grow Lights? Yes, full-spectrum LED grow lights rated at 2,000–3,000 lumens (roughly 8,000–12,000 lux at 12 inches) can effectively supplement natural light. Use a timer to mimic a 12-hour day/night cycle. Ideal for winter months or dim spaces. Watering Schedule: Based on Season, Pot Size & Humidity General Guidelines Anthurium clarinervium prefers moderate moisture — not wet, not dry. Overwatering and root rot are common beginner mistakes. Spring/Summer (active growth): Water every 5–7 days if humidity is below 50%, or every 7–10 days in higher humidity. Fall/Winter (dormant period): Water every 10–14 days or as the top 2 inches feel dry. Pot Size & Material Impact Small pots (4–6”): Dry out more quickly; monitor soil every 4–5 days in warm months. Large pots (8”+): Retain moisture longer; water less frequently, and check deeper layers before watering. Terracotta pots: Allow faster evaporation – ideal for avoiding overwatering. Plastic or glazed ceramic pots: Retain more moisture – water with extra caution. Humidity Influence If your indoor air is above 60% humidity, extend the time between waterings as moisture evaporates more slowly. A hygrometer is an easy tool to help adjust watering accordingly. Ideal Temperature & Humidity Ranges Temperature Optimal range: 18°C–24°C (65°F–75°F) Minimum survival: 12°C (54°F); prolonged exposure causes leaf drop and root damage Maximum tolerated: 30°C (86°F), provided humidity remains high Humidity Ideal relative humidity: 60%–80% Tolerable minimum: 45%; leaf edges may crisp below this level Too low: < 40% may cause persistent browning and stunt growth Tip: Place your plant in a bathroom with indirect lighting, or use a pebble tray and humidifier to raise local humidity. Common Problems and Their Solutions Yellow Leaves Cause: Overwatering or poor drainage Solution: Check root health; reduce watering frequency; switch to well-draining mix with perlite and orchid bark. Brown Leaf Edges Cause: Low humidity or salt buildup Solution: Increase humidity and flush soil monthly with distilled water. Leggy Growth Cause: Insufficient light (below 4,000 lux) Solution: Move the plant closer to a light source or add supplemental grow lighting. Pests (e.g., spider mites, mealybugs) Identify: Webbing under leaves or white cotton-like masses Treat: Wipe with 70% isopropyl alcohol or apply neem oil weekly until pest-free Is Anthurium clarinervium Toxic? Yes. Like most aroids in the Araceae family, A. clarinervium contains insoluble calcium oxalate crystals that can irritate the mouth and digestive tract if ingested. Humans: Toxic if chewed or swallowed. Keep away from young children. Pets (cats/dogs): Known to cause drooling, oral pain, vomiting (ASPCA, 2024) Always wear gloves when pruning or repotting, especially if you have sensitive skin. Useful Tricks for Successful Care Water with filtered or rainwater: Tap water high in minerals may cause leaf tip burn over time. Turn the plant monthly: This promotes even, symmetrical growth in low light conditions. Repot every 2–3 years: Use a chunky mix of sphagnum moss, perlite, charcoal, and coco coir for aeration. Prune yellowing leaves: Clean scissors with alcohol before and after cutting to prevent fungal spread. Fertilize sparingly: Feed with a diluted (1/4 strength) balanced fertilizer every 4–6 weeks in spring/summer only. Conclusion Anthurium clarinervium offers unmatched visual appeal for indoor gardeners who enjoy dramatic foliage. While its care may seem specific, the rules are straightforward once you understand the plant’s tropical origins and native environment. Pay close attention to light (8,000–15,000 lux), maintain moderate watering schedules based on your environment, and ensure adequate humidity and warmth year-round. With patience and consistency, this plant will reward you with vibrant leaves that continue to delight season after season. Whether you’re a novice houseplant keeper or an expanding enthusiast, Anthurium clarinervium is a gratifying species to grow and master. Don’t forget to monitor conditions, observe your plant’s responses, and adapt based on real-world feedback. That’s the secret to healthy indoor gardening! References American Society for the Prevention of Cruelty to Animals (ASPCA). (2024). Toxic and Non-Toxic Plants: Anthurium. Retrieved from https://www.aspca.org/pet-care/animal-poison-control/toxic-and-non-toxic-plants/anthurium Bown, D. (2000). Aroids: Plants of the Arum Family. Timber Press. Exell, A. W. (1987). Flora Neotropica Monograph 14: Anthurium. New York Botanical Garden Press.

Anthurium clarinervium Read More »

40 50cm dieffenbachia reflector dumb cane 17cm pot house plant house plant 813382

Dieffenbachia ‘Reflector’

Introduction Dieffenbachia ‘Reflector’ is one of the most visually striking foliage plants you can add to your indoor plant collection. Often admired for its unique mosaic-patterned leaves with deep green and neon-yellow speckling, this cultivar is part of the popular Dieffenbachia genus, also known as dumb cane. ‘Reflector’ is particularly beloved by plant enthusiasts for its low-maintenance nature combined with its bold, tropical appearance. If you’re looking for a statement piece that thrives indoors and requires only moderate care, Dieffenbachia ‘Reflector’ could be the perfect choice. Understanding Dieffenbachia ‘Reflector’ Dieffenbachia belongs to the Araceae family and hails from tropical regions of Central and South America. The cultivar ‘Reflector’ gets its name from its shimmering leaf patterns that appear almost reflective under certain lighting. Each leaf features deep green bases with chartreuse and lime speckles, often accented by a lighter, central midrib. This dense foliage creates a lush, jungle-like ambiance and instantly adds texture and vibrancy to home interiors. Despite its exotic look, ‘Reflector’ is relatively easy to grow. However, like all Dieffenbachias, it contains calcium oxalate crystals that make the plant toxic to pets and humans when ingested. Caution is advised, especially in homes with curious pets or young children. Ideal Growing Conditions Light Requirements Dieffenbachia ‘Reflector’ prefers bright, indirect light to flourish. Direct sunlight can scorch its leaves, leading to scorched edges or faded patterns. A few hours of early morning sun from an east-facing window or diffused light from a bright southerly exposure work well. Too little light: Can lead to leggy growth and faded variegation. Too much direct light: Causes burning or yellowing of the leaves. If natural lighting is insufficient, especially during winter months, supplemental lighting from LED grow lights can keep your Reflector thriving. Temperature and Humidity As a tropical plant, Dieffenbachia thrives in warm, humid environments. Ideal room temperatures range between 65°F to 80°F (18°C to 27°C). Avoid sudden temperature drops, drafts, or exposure to temperatures below 60°F (15°C). Humidity should ideally be over 50%. In dry climates or central-heated homes, consider the following: Use a room humidifier Group plants together for a microclimate effect Place the pot on a pebble tray with water (without touching the pot’s base) Soil Mix Dieffenbachia ‘Reflector’ prefers well-draining soil with good aeration. A suitable mix includes: 2 parts high-quality indoor potting mix 1 part perlite for airflow 1 part coconut coir or peat moss for moisture retention This custom blend ensures the roots get enough moisture without becoming waterlogged — the most common cause of root rot in indoor plants. Watering and Fertilization Watering Schedule Understanding your plant’s watering needs is critical. Dieffenbachia prefers to dry out slightly between waterings. A good rule of thumb is to water thoroughly once the top 1-2 inches of soil are dry. Water improperly, and your plant may show signs like: Underwatering: Curling or crispy leaf edges Overwatering: Yellowing lower leaves and mushy stems Always use lukewarm, filtered water if possible, as Dieffenbachia can be sensitive to salts or chemicals in tap water. Feeding Your Reflector Feed your Dieffenbachia ‘Reflector’ during the active growing season—usually from spring through early fall. A balanced houseplant fertilizer, diluted to half strength, works well every 4–6 weeks. Avoid fertilizing in the dormant winter months when the plant naturally slows its growth. Overfertilizing can result in nutrient buildup, causing leaf burn and root damage. Pruning, Repotting, and Propagation Pruning Dieffenbachia generally maintains a neat growth habit but can benefit from occasional pruning: Remove dead or yellowing leaves to maintain plant health and appearance Pinch back leggy stems to encourage bushier growth Use sterilized shears to avoid spreading pathogens Always wear gloves when pruning, as Dieffenbachia sap can irritate the skin and eyes. Repotting Repot your Dieffenbachia ‘Reflector’ every 1–2 years, or when you notice roots growing from the drainage holes. Choose a pot that’s 1–2 inches larger in diameter and ensure it has adequate drainage. Repotting is best done in spring or early summer. Propagation Propagation of Dieffenbachia ‘Reflector’ is best achieved via stem cuttings. Here’s a simple method: Choose a healthy, mature stem and cut a 4–6 inch section with at least one node Let the cutting callous over for a few hours Place the cutting in water or moist sphagnum moss Keep it in a warm, humid environment with indirect light Transplant to soil once roots are 1–2 inches long Be patient—rooting can take several weeks. Ensure the cutting does not rot by changing water regularly or keeping moss just slightly moist. Common Issues and How to Solve Them Like many indoor plants, Dieffenbachia ‘Reflector’ can sometimes experience issues. Here are common problems and how to address them: Yellow Leaves Often caused by overwatering or poor drainage. Check your watering habits and improve soil aeration or repot if needed. Browning Leaf Tips This could be due to low humidity, salt buildup from fertilizer, or inconsistent watering. Increase humidity and flush the soil monthly with distilled water. Pest Problems While generally resilient, your plant can still attract pests like: Spider mites: Fine webbing and stippled leaves Mealybugs: White, cottony clumps at leaf axils Scale: Hard, brown bumps on stems or leaves Treat with insecticidal soap, neem oil, or isolate the affected plant and gently wipe pests with alcohol-soaked cotton swabs. Tips for Happy, Healthy Growth Rotate your plant every few weeks to maintain symmetrical growth Dust the leaves regularly with a damp cloth to help with photosynthesis Keep it on a plant stand or elevated shelf to showcase its foliage Avoid moving or repotting frequently unless necessary, as it can stress the plant Conclusion Dieffenbachia ‘Reflector’ is a gem among indoor foliage plants. With its exotic leaf patterns, easy-care nature, and tropical elegance, it’s well-suited for plant enthusiasts of all levels. By understanding its specific needs—adequate light, humidity, consistent watering, and the occasional feeding—you can enjoy a thriving plant that enhances any indoor space. Whether you’re just beginning your plant journey or expanding a well-loved collection, this stunning cultivar is sure to reflect your

Dieffenbachia ‘Reflector’ Read More »

Chinese Evergreen (Aglaonema 'Silver Bay')

Aglaonema Silver Bay Care Guide

Introduction If you’re looking for a beautiful, low-maintenance houseplant with gorgeous foliage, Aglaonema ‘Silver Bay’ is a fantastic choice. Also known as Chinese Evergreen, this tropical plant is known for its striking silver-green leaves and its ability to thrive in low light conditions. Whether you’re just beginning your houseplant journey or you’re a seasoned indoor gardener, Aglaonema Silver Bay is a versatile and forgiving companion. In this care guide, we’ll walk you through everything you need to know to keep your Silver Bay healthy and thriving. Plant Overview Light Requirements One of the best qualities of Aglaonema Silver Bay is its adaptability to various lighting conditions. It performs well in: However, Aglaonema Silver Bay should be kept out of direct sunlight, which may scorch or fade its stunning leaves. Expert Tip: If the plant’s new leaves appear smaller or lose color, it may need more light. Try moving it closer to a window filtered with sheer curtains. Watering Aglaonema likes to dry out a bit between waterings. Overwatering is one of the most common mistakes made with this plant. To get it just right: Signs of improper watering include: Humidity and Temperature Aglaonema Silver Bay thrives in warm, humid environments, mimicking its tropical origins. Here’s how to keep it comfortable: Humidity Boosting Ideas: Soil and Potting Aglaonema prefers a well-draining soil mix that retains some moisture but doesn’t stay soggy. A good mix might include: Ensure your pot has drainage holes to prevent root rot. Repot the plant every 1–2 years or when it becomes rootbound. Repotting is best done in the spring when the plant is actively growing. Fertilizing Fertilize your Aglaonema Silver Bay during the growing season (spring and summer) to encourage lush new growth. Use a balanced, water-soluble houseplant fertilizer at half strength every 4–6 weeks. Fertilizing Do’s and Don’ts: Pruning and Maintenance Aglaonema Silver Bay is generally low-maintenance when it comes to pruning. Still, some quick grooming tips will help it look its best: Cleaning Tip: Wipe the leaves once a month with a microfiber cloth or soak a clean sponge in lukewarm water to remove accumulated dust. This not only improves appearance but also photosynthesis efficiency. Propagation One of the joys of owning an Aglaonema Silver Bay is how easy it is to propagate and share with plant-loving friends. The simplest method is division: Keep the new divisions in a warm, humid area with indirect light to help them establish quickly. Pest and Disease Management Aglaonema is relatively resistant to pests, but it’s good to stay vigilant. Watch out for: If pests appear, treat with insecticidal soap or neem oil. Isolate affected plants to prevent spreading. Common Diseases Include: Is Aglaonema Silver Bay Toxic? Yes, Aglaonema is considered toxic to pets and humans if ingested. It contains calcium oxalate crystals that can cause irritation, drooling, and stomach upset in cats, dogs, and people. Pet Safety Tips: Conclusion Aglaonema Silver Bay brings both visual elegance and ease of care into your indoor space. With its beautiful foliage and forgiving nature, it’s an excellent choice for beginners and seasoned plant lovers alike. Just follow a few simple care steps—adequate light, proper watering, and occasional grooming—and your Silver Bay will reward you with years of handsome, healthy growth. Once you’ve enjoyed success with this resilient plant, you may find yourself exploring other charming Aglaonema varieties. Until then, happy planting! References

Aglaonema Silver Bay Care Guide Read More »