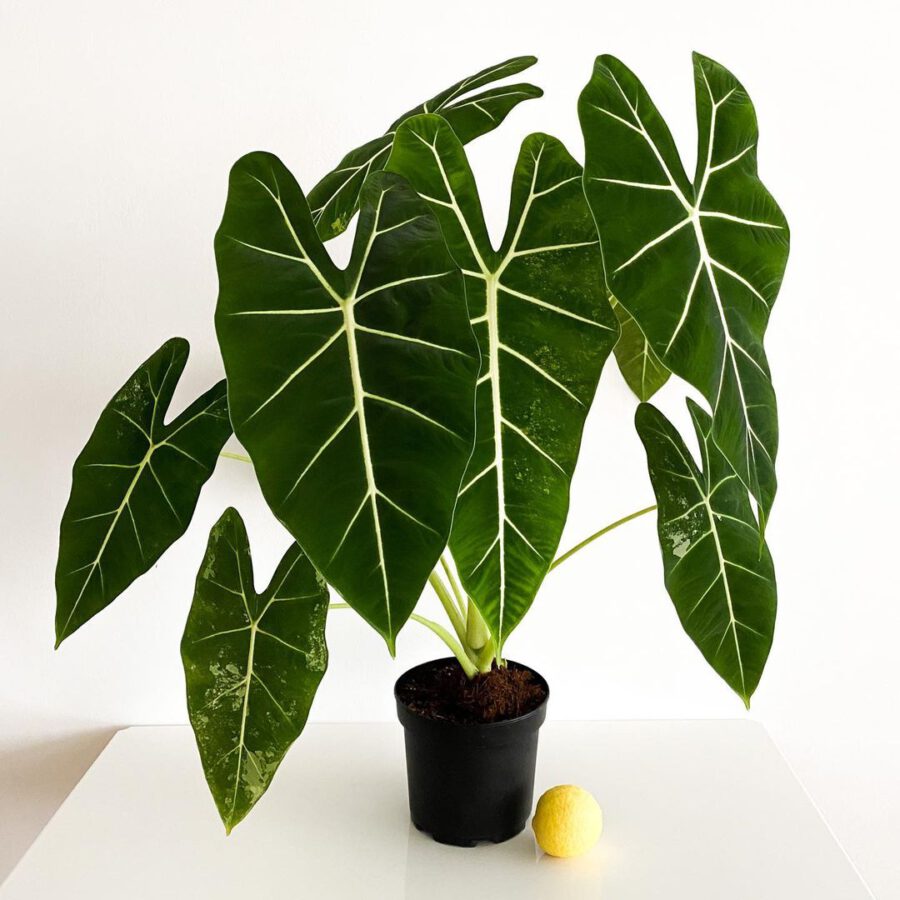
Leaf Lee

4

How to Grow Plants from Seeds Indoors Successfully

Introduction: Why Growing Plants from Seeds Indoors Is Beneficial Growing plants from seeds indoors provides a rewarding opportunity for gardeners to experience the full life cycle of their plants, starting from the simplest seeds to mature growth. Whether you’re aiming for vegetables, herbs, or ornamental plants, nurturing seeds indoors gives you greater control over growing conditions, allows you to start your gardening earlier in the year, and often leads to stronger and healthier seedlings. However, this process can be intimidating, especially for beginners. This detailed step-by-step guide will help you successfully grow healthy plants from seeds indoors by covering all crucial aspects—from selecting the right seeds and equipment to managing optimal nurturing conditions including light, water, humidity, and temperature control. Tools and Materials You’ll Need Step-by-Step Guide for Growing Plants Indoors from Seeds Step 1: Choose and Prepare your Seeds Select fresh, high-quality seeds that are appropriate for indoor propagation. Always check the seed packet for specific guidelines on depth, spacing, and germination requirements. For improved germination rates, some seeds can benefit from soaking overnight (12–24 hours) in warm water before planting. Step 2: Prepare the Seed-Starting Mix and Containers Choose a sterile, well-draining seed-starting mix designed specifically for germination. Moisten the soil evenly before placing it into containers—each cell or pot should be filled and slightly compacted to leave approximately ¼-inch of space from the top rim. Step 3: Plant Seeds Correctly and Clearly Label Them Insert seeds at a depth recommended on the seed packet (typically 1½–2 times the diameter of the seed). Cover lightly with soil mix and press gently. Label each container right away using plant labels marked clearly, specifying plant name, variety, and planting date. Step 4: Provide Proper Watering and Humidity Control Initial watering should be gentle but thorough, using a spray-bottle mist to prevent seed displacement. Keep seeds consistently moist but not waterlogged. Cover trays or pots with humidity domes or loosely with plastic wrap to maintain humidity levels between 60–80%, crucial for germination, usually achieved within 7–21 days depending on the species. Step 5: Ensure Optimal Temperatures for Germination Seeds require hovering temperatures between 65–80°F (18–27°C) for optimum germination rates. A heating mat under seed trays can reliably ensure soil temperature remains consistently within this range. Check temperatures often by using soil thermometer probes, adjusting heat mats accordingly. Step 6: Control Lighting Conditions Properly Seeds generally do not require significant light until germination occurs. However, immediately upon seedling emergence, plants must receive adequate daily light. Provide artificial grow lights with an intensity range between 10,000–15,000 lux evenly distributed, promoting strong stems and healthy leaf development. Position lights no more than 3–4 inches above seedlings to prevent legginess. Keep the lights on for 12–16 hours per day, ensuring a regular schedule with automatic timers if possible. Step 7: Transferring Seedlings to Larger Containers (Potting Up) When seedlings develop their first true leaves (usually within 2–4 weeks after germination), transplant each seedling carefully into individual pots measuring 4–6 inches wide, filled with nutrient-rich potting mix that supports further growth. Water gently to encourage establishment. Step 8: Maintain Adequate Nutrient Supply After seedlings have produced their first true leaves, apply mild, balanced, water-soluble fertilizers (such as a diluted 10-10-10 solution) every two weeks to encourage strong development. Always follow fertilizer manufacturer’s recommended dilution rates strictly to avoid root damage. Step 9: Harden Off Before Outdoor Planting (For Outdoor-bound Plants) If intending to transplant seedlings outside eventually, introduce your plants to outdoor conditions gradually. Start 7–14 days before final outdoor planting by placing seedlings in shade or indirect light for 2–3 hours per day, slowly increasing outdoor exposure daily until seedlings can comfortably handle full outdoor exposure. Ideally, outdoor temperatures at planting should consistently range between 55–75°F (13–24°C), depending on plant preference. Care Conditions to Monitor for Healthy Indoor Growth Lighting Watering and Humidity Temperature Air Circulation and Ventilation Common Mistakes to Avoid Conclusion Successfully growing plants indoors from seeds requires commitment to correct practices, strong observation skills, and maintaining optimal plant-care conditions. Beginners and enthusiastic home gardeners can easily manage these steps by carefully organizing their indoor gardening space and regularly monitoring plant health. By patiently attending to seedling needs with stable temperature, humidity, precise watering, and adequate lighting, gardeners improve their odds considerably. Those who desire greater control over seedling vitality and variety choices especially benefit from indoor seed-starting practices detailed here. References

How to Grow Plants from Seeds Indoors Successfully Read More »

propagation by cuttings of jasmine the cuttings are planted in the ground and soaked in water.jpg s1024x1024wisk20c iursjc4cct8uuu2ctjdznovj8m6e2esjquuddqwgqy

Stem Cutting vs Leaf Cutting: What’s the Difference?

Introduction to Plant Propagation Methods Plant propagation allows gardeners to multiply favorite plants, create identical offspring, and maintain desirable traits. Among many propagation methods, stem cutting and leaf cutting are popular approaches frequently used by home gardeners. Each possesses unique steps, success rates, and suitable plant choices. Understanding these differences helps you select the most reliable method based on plant type and your gardening objectives. In this article, we’ll explore the detailed comparison between stem cuttings and leaf cuttings, including the pros, cons, suitable plants, specific care needs, and success timelines for propagation. Stem Cutting: Overview and Considerations A stem cutting involves removing a healthy section of stem from a mature parent plant and rooting it to produce a new independent plant. Typically, the cutting has several nodes—small bumps or joints on the stem from which new roots and shoots develop. Step-by-Step Guide to Stem Cutting Ideal Environmental Conditions for Stem Cuttings Timelines & Success Rates for Stem Cutting Propagation Most stem cuttings, under proper conditions, root within 3–6 weeks. Species like Coleus and Pothos easily root in 2 to 4 weeks, while woody or semi-woody plants like Rosemary may take 5–8 weeks. Leaf Cutting: Overview and Considerations Leaf cutting is a technique used for propagating plants capable of regenerating both roots and new growth from leaf tissues alone. Unlike stems, leaf cuttings involve using individual leaves or partial leaves without stem material. Step-by-Step Guide to Leaf Cutting Ideal Environmental Conditions for Leaf Cuttings Timelines & Success Rates for Leaf Cutting Propagation Leaf cuttings typically require somewhat longer time frames than stem cuttings. Rooting and generating a new plantlet can take anywhere between 4 and 12 weeks, depending on species. African violets usually root within 4–8 weeks, while Snake plants and some succulents may require 6–12 weeks. Stem Cutting vs Leaf Cutting: Pros and Cons Stem Cutting Pros: Stem Cutting Cons: Leaf Cutting Pros: Leaf Cutting Cons: Visual Comparison Table Conclusion Both stem cutting and leaf cutting offer valuable propagation options tailored for diverse plant varieties. Stem cuttings provide fast growth, suitability for various plant types, and quicker establishment, ideal for those seeking immediate results. In contrast, leaf cutting is advantageous when limited plant material is available or for specific succulent and leaf-propagable houseplants. Gardeners seeking rapid propagation and broader plant compatibility typically benefit from stem cuttings, while patient enthusiasts specializing in select species like African violets or succulents would find leaf cuttings more rewarding. APA References

Stem Cutting vs Leaf Cutting: What’s the Difference? Read More »

1 1 1 stem cutting min a731d7cc25

Best Time of Year to Propagate Houseplants

Understanding Houseplant Propagation Cycles Propagating houseplants can feel incredibly rewarding, yet achieving consistent success often depends on choosing the right time of year. Plants, like people, experience seasonal fluctuations in their growth patterns. These cyclic phases greatly influence rooting speed, vigor, and ultimate success rate. Knowing when to propagate ensures more reliable outcomes. Generally, houseplant propagation succeeds best during the active growing season, typically spring and early summer. At this time, conditions are ideal for robust root and foliage growth. However, there are nuances influenced by specific plant species, regional climates, and household environmental factors that are crucial to understand. Why Seasons Matter in Plant Propagation Successful propagation depends primarily on plant hormones and growth responses influenced by external factors. Taking cuttings or divisions when plants naturally channel energy into growth and renewal yields a higher likelihood of rooting and survival. Below are the environmental conditions and variables that matter most: Light Availability Houseplants typically grow best with bright indirect light (10,000–15,000 lux). In spring and early summer, the intensity, duration, and quality of natural sunlight are higher, supporting new growth and leaf development. This increased light availability translates directly into stronger rooting and faster establishment of cuttings. Temperature Requirements Most houseplants root most effectively within a specific, moderately warm temperature range of approximately 65–77°F (18–25°C). During spring and summer, indoor temperatures usually fall within this ideal propagation zone without extra heating or adjustments. Cooler seasons may force growth into dormancy, while hotter midsummer temperatures above 85°F (29°C) could stress tender cuttings. Humidity Levels Humidity is critical for rooting cuttings and growing seedlings. Optimal humidity levels for propagation range between 60–80%. Springtime indoor humidity usually stabilizes around 50–60%, making it relatively easy to increase levels slightly through simple methods like humidity trays or transparent humidity domes. Winter’s heating systems, conversely, cause indoor air to drop as low as 20–30%, complicating propagation. Plant Hormonal Activity Plants possess internal hormonal signals that guide growth, dormancy, and rooting. During winter, most indoor houseplants become mostly dormant, significantly slowing hormone-driven growth stimulation. When spring approaches and daylight hours slowly increase beyond 11–12 hours per day, houseplants begin actively producing growth hormones like auxins that promote root formation, essential for propagation success. Ideal Timeframes and Propagation Windows For clarity, let’s outline specific timelines when indoor propagation experiences the highest success: Propagation Method: Adaptations by Season Just as important as timing is selecting the correct propagation approach for the season. Here’s a straightforward breakdown: Spring (Best Season) Summer (Requires Attention) Autumn (Reduced Success) Winter (Least Favorable) Special Considerations for Common Plants Different houseplants have unique propagation preferences. Here’s a quick guide covering popular indoor plants: Conclusion Houseplant propagation success largely depends on understanding the best environmental conditions and aligning cuttings or divisions with plants’ natural growth cycles. Generally, propagation is most successful and efficient in early spring through early summer, due to readily available natural sunlight, higher humidity, ideal temperatures, and optimum plant hormonal activity. Home gardeners, especially beginners, benefit immensely from aligning their propagation activity with these natural windows of opportunity to ensure consistent success and healthy, robust new plant growth. References

Best Time of Year to Propagate Houseplants Read More »

2f864fee 9882 4269 a9d9 ddbfd54d32b5

How to Create a Propagation Station at Home

Introduction to Plant Propagation Stations Propagation stations have quickly gained popularity among plant enthusiasts and casual gardeners alike, providing an effective and stylish method to propagate new plants from your existing indoor green spaces. A propagation station is essentially a designated spot or setup in your home specially designed to help plants grow roots in water or soil medium before transplanting them into their permanent pots or garden beds. Although propagation can appear daunting, creating a dedicated propagation station at home is both easy and rewarding, providing the right conditions conducive for successful rooting and growth. This comprehensive step-by-step guide provides the detailed information required to create your first propagation station at home, ensuring optimal conditions and care recommendations to maintain healthy, thriving plants ready for transplanting in 2–4 weeks. Benefits of Having a Home Propagation Station A propagation station helps you maintain organized and controlled conditions for producing new plant cuttings. This focused environment greatly enhances your chance of rooting success and plant growth, allowing you to expand your collection or replace aging plants. The primary advantages of home-based propagation include: Tools and Supplies Needed for a Successful Propagation Station To set up your propagation station, certain essential tools and materials are necessary. Here is a clearly defined list of required equipment: Step-by-Step Guide to Setting Up a Propagation Station at Home Step 1: Selecting the Right Plants to Propagate The success rate for home propagation typically begins with selecting suitable plants. Ideal beginner-friendly plants with high rooting success rates include pothos, spider plants, philodendron, monstera, ivy, snake plants, and peperomia. Avoid plants that are difficult to propagate from cuttings, such as mature woody plants, succulents that prefer leaf-cutting propagation, or plants susceptible to rot. Step 2: Preparing Your Plant Cuttings for Propagation Step 3: Placing Your Cutting into the Propagation Medium Depending on your preference, propagation can be accomplished in water or directly in soil: Step 4: Choosing an Ideal Location and Environmental Conditions Step 5: Maintenance and Care for Your Propagation Station Step 6: Transplanting Your Cuttings to Soil With proper care and optimal conditions, rooting success typically occurs within 2–4 weeks. Healthy roots between 5–8 cm (2–3 inches) indicate readiness for transplanting. Gently transplant cuttings to their permanent pot filled with well-draining potting soil. After transplant, carefully adjust watering and lighting gradually, allowing the plant to adapt to new environments. Common Challenges and Troubleshooting Tips Conclusion Establishing a home propagation station is accessible and beneficial to beginner gardeners and plant enthusiasts aiming to propagate plants effectively while enhancing plant-growing skills. Consistent maintenance and carefully regulated environmental controls ensure rooting success and healthy plant development. Home propagation stations provide an educational and rewarding experience that contributes to sustainability and personal satisfaction in indoor gardening. References

How to Create a Propagation Station at Home Read More »

19.begoniabladrex

Begonia Rex

Mastering Watering: How to Properly Water Your Indoor Plants Watering your indoor plants might seem like the simplest task in plant care, but it’s also one of the most misunderstood. Too much or too little water is the number one reason houseplants struggle. At Leaf Plant Garden, we’re passionate about helping you grow healthy, thriving foliage in your home, and that starts with understanding the art and science of watering. Why Proper Watering Matters Each plant relies on water for basic survival functions, including transporting nutrients, hydrating cells, and carrying out photosynthesis. However, not all plants need the same amount or frequency of watering. Knowing what your individual plant needs can prevent common problems such as root rot, yellowing leaves, wilting, or fungal diseases. Key Factors That Affect Watering Needs Before diving into how often to water, understand that these variables all influence your plant’s thirst: Plant species: Some, like peace lilies, love moisture. Others, like snake plants, prefer things on the dry side. Pot size and material: Small pots dry out faster. Terracotta absorbs moisture, while plastic retains it. Humidity and temperature: Warm and dry indoor air accelerates water evaporation. Light exposure: Plants in bright light photosynthesize more and tend to use more water. Soil type: Well-draining soil allows excess water to escape, preventing root rot. Understanding Signs of Overwatering and Underwatering Knowing how to “listen” to your plants is crucial. Both too much and too little water can look similar, but here’s how to tell them apart: Signs of Overwatering Yellowing leaves (especially the lower ones) Mushy stems or roots Moldy soil or fungus gnats Leaves dropping despite moist soil Signs of Underwatering Crispy or curling leaves Soil pulling away from the pot edges Drooping or wilting (and dry to touch) Browning leaf tips How to Check If Your Plant Needs Water The best way to avoid guesswork is to develop a routine and rely on simple techniques: Finger test: Stick your finger about 1 to 2 inches into the soil. If it feels dry at that depth, it’s probably time to water. Lift test: Pick up the pot. Lightweight pots indicate dryness; heavier pots suggest moisture inside. Moisture meter: A handy tool that gives digital feedback on soil moisture levels. Best Practices for Watering Indoor Plants Once you know when to water, the how becomes just as important. Follow these simple but effective tips: 1. Water Thoroughly but Infrequently When watering, do so until water runs out of the drainage holes. This ensures the entire root system gets moisture. Avoid “sips” which promote shallow roots and uneven hydration. 2. Use Room Temperature Water Cold water can shock plant roots, while hot water can damage them. Let tap water sit for several hours before watering for best results—this also allows chlorine to dissipate. 3. Morning is Best Water your plants in the morning when possible. This allows the plant to absorb moisture during the day and prevents nighttime dampness that can cause fungal growth. 4. Empty Saucers After Watering Standing water in saucers can lead to root rot. After thirty minutes, discard any excess water that has collected beneath your pot. 5. Adjust by Season Most indoor plants go into a slower growth phase during autumn and winter and thus require less water. Be careful not to overwater during these cooler months. Specific Tips for Common Indoor Plants Snake Plant (Sansevieria) Water about every 2–4 weeks, allowing the soil to dry completely between. In winter, reduce even more. Overwatering is its number one enemy. Fiddle Leaf Fig (Ficus lyrata) Needs consistent soil moisture but not soggy roots. Water when the top 1–2 inches feel dry. Use well-draining soil and a pot with good drainage. Pothos (Epipremnum aureum) Flexible and forgiving, but prefers soil to dry out moderately between watering. Signs it’s thirsty: droopy leaves that perk up after watering. Peace Lily (Spathiphyllum) Loves moist soil—check frequently and water when surface feels dry. Leaves will droop dramatically when thirsty, but recover quickly. Common Watering Mistakes to Avoid Watering on a strict schedule: Don’t water every Sunday “just because.” Let the plant and soil tell you instead. No drainage: A decorative pot without drainage holes can lead to trapped water and root rot. Misting instead of watering: Some plants love humidity, but misting isn’t a substitute for watering the soil properly. Using softened tap water: High salt levels from softened water can harm roots over time. Use filtered or dechlorinated tap water instead. Conclusion Mastering the art of watering is one of the most essential skills in keeping your indoor plants happy and thriving. By paying attention to plant type, soil conditions, pot material, and seasonal changes, you’ll develop an intuition for when and how much to water. Remember, it’s better to underwater slightly than to overwater—plants can recover from thirst more easily than from soggy, damaged roots. With a little observation and practice, you’ll be able to meet each of your green friends’ unique hydration needs. Happy growing from all of us at Leaf Plant Garden!

Begonia Rex Read More »

微信图片 20250712154141

Monstera Deliciosa

The Magic of Moss Poles: How They Support Climbing Plants Climbing plants are some of the most striking and satisfying houseplants to grow. They start small, twining and trailing, and before you know it, they’re climbing toward the sunlight in search of space to grow. But without proper support, those beautiful vines can become tangled or droopy. That’s where moss poles come in. These vertical supports provide structure, moisture, and a natural feel that many tropical climbers love. In this article, we’ll explore the benefits of moss poles, which plants need them, and how to use them effectively in your indoor garden. What Is a Moss Pole? A moss pole is a vertical support structure covered in sphagnum moss (or sometimes coco coir) that mimics the texture of tree bark. It’s commonly used with a stake or PVC pipe wrapped in moist moss and secured with twine or netting. Moss poles can be purchased pre-made, or you can create your own. The main function of a moss pole is to provide climbing plants with a surface their aerial roots can grip and grow into. But the benefits don’t stop there. Why Use a Moss Pole? Supports vertical growth: Helps your plant grow upward rather than sprawling outward. Encourages larger leaves: Many plants produce bigger leaves when they have something to climb. Improves air circulation: Uplifting vines prevents overcrowding and fosters healthier growth. Mimics natural habitat: Provides a realistic climbing surface similar to tree trunks found in tropical environments. Enhances aesthetics: Elevates the beauty of your plant with a structured, dramatic look. Best Climbing Plants for Moss Poles Not every houseplant is suited for a moss pole. They work best with climbing or aroid plants that naturally produce aerial roots and seek vertical support in the wild. Here are some of the most popular moss pole-loving plants: Monstera deliciosa: Also known as the Swiss cheese plant, it climbs using aerial roots and produces larger, fenestrated leaves when supported. Philodendron species: Especially the heartleaf (Philodendron hederaceum) and the giant-leaf ‘Selloum’ types benefit from structural growth support. Pothos (Epipremnum aureum): Thrives with vertical access and can grow significantly larger leaves when trained up a pole. Syngonium: This arrowhead plant has a natural tendency to climb and responds well to moss poles. Rhaphidophora tetrasperma: Sometimes called “Mini Monstera,” this fast grower becomes bushier and more robust when climbing. How to Set Up a Moss Pole Adding a moss pole to your plant is relatively simple, and the results are often dramatic. Follow these steps to set up a moss pole correctly: 1. Choose the Right Pole You can buy a ready-made moss pole or make your own using sphagnum moss, a bamboo stick, PVC pipe, or wooden dowel. Wrap the moss around your base and secure it with garden twine or mesh. 2. Moisten the Moss Moss needs to stay moist to attract the plant’s aerial roots. Before installing, soak the pole in water so it’s evenly damp—but not dripping wet. 3. Insert the Pole Gently insert the pole into your plant’s pot, keeping it close to the base of the plant without disturbing the roots too much. It should be deep enough to support the plant’s weight as it grows taller. 4. Tie the Vines Using plant ties, twine, or soft clips, loosely tie the vines to the pole. This trains the plant to climb upward and helps aerial roots find their way into the moss. 5. Keep the Pole Moist Mist the moss pole regularly, ideally every few days or whenever it feels dry. Consistent moisture encourages root attachment and faster, healthier growth. Tips for Moss Pole Success Use distilled or rainwater when misting to avoid mineral build-up on the moss. Rotate your plant every few weeks so all sides receive light and encourage even growth around the pole. Fertilize regularly, as climbing plants put out more energy when growing vertically. Upgrade when necessary: If your plant outgrows its moss pole, you can carefully splice on an extension or repot with a taller pole. Prune strategically: To maintain a neat shape and encourage branching, prune leggy stems and new growth tips. DIY Moss Pole: A Quick How-To Guide Making a moss pole at home is a fun and budget-friendly option. Here’s what you’ll need: 1 PVC pipe, bamboo stake, or wooden dowel (12–36 inches) Sphagnum moss (soaked in water for 15–20 minutes) Garden twine or wire mesh Scissors or pruners Gloves (optional but helpful for handling moss) Instructions: Soak the sphagnum moss and wring it out until damp but not soaking. Wrap handfuls of moss around your support rod generously. Secure the moss with twine every few inches, or wrap it in plastic mesh to keep it in place. Stick the pole into your plant’s pot and loosely tie stems to the pole. Common Mistakes to Avoid Even with the best intentions, a moss pole can become more of a decorative stake if not used correctly. Keep these mistakes in mind: Not misting the pole: Dry moss doesn’t invite aerial roots, so keep it consistently damp. Using thin poles for large plants: Make sure your moss pole is sturdy enough to hold your plant upright. Waiting too long to train your plant: It’s easiest to encourage climbing habits when the plant is young and flexible. Damaging roots when inserting the pole: Always insert the support carefully to avoid harming the root system. Conclusion: Let Your Plants Reach New Heights Moss poles are far more than a trendy houseplant accessory — they play a vital role in supporting healthy, vertical growth for your leafy climbers. Whether you grow a Monstera, Pothos, or Philodendron, giving your plants the vertical real estate they crave can lead to larger leaves, stronger stems, and a more natural appearance overall. Don’t be afraid to experiment with moss poles in your indoor garden. Once you see your plant grab hold and start climbing skyward, you’ll understand why moss poles are a favorite among plant enthusiasts. Happy growing!

Monstera Deliciosa Read More »

20201118112744 124727

How to Propagate Snake Plants from Leaf Sections

The snake plant (Sansevieria trifasciata), sometimes referred to as mother-in-law’s tongue, is a favorite houseplant among beginners and experienced gardeners alike because of its durability, minimal maintenance, and air-purifying properties. Beyond these appealing traits, snake plants are also incredibly easy to propagate, particularly from leaf cuttings. Propagating snake plants from leaf sections is an inexpensive and simple way to multiply your collection or share plants with friends. This guide will provide a detailed, step-by-step tutorial to successfully propagate snake plants from leaf sections, outline the essential tools you require, optimal care conditions, and expected timelines for successful rooting. Benefits of Propagating Snake Plants from Leaf Sections Before starting, it’s beneficial to understand why propagating snake plants using leaf cuttings is advantageous compared to other propagation techniques: Tools and Materials You’ll Need Here is a concise checklist of all the equipment and materials you’ll need before starting your leaf propagation: Step-by-Step Guide to Propagating Snake Plants from Leaf Sections Step 1: Selecting and Preparing the Leaf Begin by choosing a healthy, mature leaf from a robust mother plant. Inspect the leaf meticulously and ensure it has no signs of disease, discoloration, or damage. Older, fully-developed leaves towards the outside of the plant are typically preferable for propagation because of their vigor and nutrient stores. Using a clean, sharp knife or gardening shears cuts down infection risks. Cut the leaf at the base, near the soil line. Step 2: Cutting the Leaf into Sections On a sterilized, clean surface, divide the snake plant leaf into sections approximately 2–4 inches (5–10 centimeters) long. Be mindful of maintaining the same orientation regarding top and bottom ends of each piece—it is crucial to keep track of this because only the “bottom” end of each section will root. It’s beneficial to make a small, angled cut or small nick at the bottom of each segment to easily remember which side goes into the soil. Step 3: Allowing Leaf Sections to Callus Place your freshly cut leaf sections aside in a cool, dry location out of direct sunlight for approximately 2–5 days. This timeframe allows the cut ends to callus over, significantly reducing the risk of fungal infections and rot when placed in moist media. Avoid placing leaf sections in a humid or damp environment at this stage. Step 4: Preparing the Growing Containers Choose appropriate propagation containers—ideally pots with drainage holes about 4–6 inches in diameter. Fill pots with a lightweight and fast-draining propagation medium. A recommended mix is half cactus/succulent potting soil and half perlite or coarse sand. This mixture facilitates optimal drainage, air circulation around the roots, and significantly reduces the risk of root rot. Step 5: Planting Leaf Sections in Soil Dip the calloused bottom ends of each leaf section in rooting hormone powder (optional but recommended for quicker rooting and higher success rate). Gently insert each leaf section vertically into the soil, pushing them down about 1–2 inches (2.5–5 centimeters) below the soil’s surface. Ensure about half of each leaf cutting is below the soil’s surface, providing stability and sufficient contact area for rooting. Step 6: Caring for Planted Leaf Sections Step 7: Monitoring Root Growth and Planting New Shoots Typically, leaf cuttings start rooting within 4–8 weeks, depending significantly on environmental conditions, ambient temperature, and individual plant health. After successful rooting, the new leafy shoots can emerge from the soil approximately 8–12 weeks after propagation. Until this stage, patience is key—do not disturb or continually uproot cuttings to check for roots, which risks damage. Troubleshooting Common Problems Conclusion Propagating snake plants from leaf cuttings is cost-effective, straightforward, and enjoyable—it requires only a few inexpensive tools and some careful initial steps in cutting and preparing leaves. Within approximately 8–12 weeks under optimal conditions, you can enjoy multiple healthy new plants from just one leaf. This propagation technique is particularly beneficial for beginner indoor gardeners, houseplant enthusiasts, or anyone looking to extend their collection affordably and effectively. By following the precise steps outlined in this detailed guide, novice gardeners and experienced indoor plant collectors alike will successfully propagate and expand their snake plant collection with confidence and ease. APA References

How to Propagate Snake Plants from Leaf Sections Read More »

微信图片 20250712151102

Ctenanthe vs Stromanthe

Comparing Ctenanthe and Stromanthe: Helping You Choose the Right Prayer Plant Look-Alike Indoor plant lovers are drawn to the bold patterns, vibrant colors, and tropical flair of prayer plants—but what many don’t realize is that some striking houseplants often mistaken for each other actually belong to different genera. Two of the most commonly confused foliage beauties are Ctenanthe and Stromanthe. With their elaborately patterned leaves and similar growth habits, it’s easy to see why people mix them up. However, these plants have distinct traits that can make one a better choice over the other, depending on space, care experience, light levels, and even whether you own pets. Both Ctenanthe and Stromanthe belong to the Marantaceae family—commonly known as the prayer plant family—and share the attractive trait of nyctinasty: moving their leaves up and down in response to light, like folding in prayer. But beyond their botanical behavior, there are clear differences in growth style, care requirements, leaf markings, and environmental needs that can be crucial for plant health and aesthetics indoors. If you’re deciding between the two, this comparison will help you confidently choose the one that suits your space and lifestyle. Quick Comparison Table: Ctenanthe vs. Stromanthe Feature Ctenanthe Stromanthe Botanical Name & Family Ctenanthe spp.; family Marantaceae Stromanthe spp.; family Marantaceae Native Region Tropical rainforests of Brazil Tropical forests of Central and South America, especially Brazil Leaf Shape & Size Ovate to lanceolate; typically 4–12 in (10–30 cm) long Broad with elliptical shape; often 6–15 in (15–38 cm) long Growth Habit & Speed Clumping, bushy form; moderate to fast growth Upright with a rosette-like base; slow to moderate growth Stem Structure or Identifiers Short stems; some species spread with underground rhizomes Longer, thicker stems; colorful undersides (deep pink/red) Light Requirements Medium to bright indirect light; ideally 500–1,500 lux Bright indirect light preferred; 1000–2000 lux ideal Watering and Humidity Keep soil moist, not soggy; 50–70% humidity ideal Likes consistently moist soil; needs 60–80% humidity Pet Safety / Toxicity Generally non-toxic to cats and dogs (ASPCA-rated safe) Non-toxic to pets (ASPCA-rated safe) Typical Price & Availability Moderate price; very commonly available in garden centers Moderate to high price; limited availability, often sold online or specialty shops Understanding the Key Differences in Depth Visual Identity: Leaf Patterns and Coloration One of the most obvious yet nuanced differences lies in leaf coloration and markings. Ctenanthe species like Ctenanthe burle-marxii and Ctenanthe setosa feature silver-green leaves with patterned darker green pinstripes or blotches in harmonious shades. Their look is subtle yet interesting—ideal for a calming or minimalist aesthetic. In contrast, Stromanthe triumphs in dramatic flair. The most popular cultivar, Stromanthe sanguinea ‘Triostar’, boasts creamy variegation, vivid green contrast zones, and hot pink or deep red undersides. These leaves have a more elliptical, painterly quality, making them a favorite among interior decorators. The high-contrast variegation, however, requires more light to maintain. Growth Habit and Space Considerations Ctenanthe tends to form clumping, low-lying bushes due to its habit of growing from underground rhizomes. This gives it a fuller appearance and makes it more appropriate for table or shelf placement. Some species can eventually fill out horizontally, especially in large pots or floor planters. Stromanthe, on the other hand, has an upright rosette form and thicker central stems. It typically grows more vertically, with arching, paddle-shaped leaves that fan out. This makes it better suited for floor pots or corner displays. However, it’s slower-growing and can become quite large—reaching up to 2–3 feet tall over time—so it may require strategic spacing indoors. Light + Humidity Needs: Subtle But Important While both plants fall under “bright indirect light” preferences, Stromanthe’s variegated leaves are more sensitive to lighting conditions. Variegation can fade or become irregular in low light (<1000 lux), while direct light may scorch its colorful foliage. Meanwhile, Ctenanthe tolerates a slightly broader light range and can manage better in moderate indoor light conditions around 500–1,000 lux, although brighter light will intensify markings without bleaching. Humidity is perhaps Stromanthe’s greatest challenge for beginners. It prefers high levels (60–80%), and crisping of leaves is common in drier indoor air. Ctenanthe, while also a humidity lover, is more forgiving and can tolerate levels down to 50% without visible stress—though both plants benefit from pebble trays, humidifiers, or grouped placement. Ease of Care and Beginner Friendliness Hands down, Ctenanthe is easier to grow for novice plant parents. It’s slightly more tolerant of irregular watering and can adapt more flexibly to room conditions. Stromanthe’s beauty comes at a price: it’s sensitive to both over-and under-watering, does poorly in low humidity, and may drop leaves or stop growing if stressed. The payoff is stunning variegation, but only if its needs are consistently met. Which One Should You Choose? Choosing between Ctenanthe and Stromanthe comes down to your indoor environment, your level of experience, and your aesthetic goals. Here’s a quick breakdown to guide your decision: As a rule of thumb, go with Ctenanthe if you want a reliable, low-maintenance foliage plant with elegant markings. Choose Stromanthe if you’re ready to pamper a high-maintenance beauty with dramatic color payoffs. Conclusion While Ctenanthe and Stromanthe share family ties and similar prayer-like leaf movements, their care requirements and appearances are distinct enough to matter. Ctenanthe brings subtle elegance and greater tolerance for imperfections—and is better suited for beginner plant lovers. Stromanthe requires more precise conditions but rewards growers with dazzling foliage if kept happy. By understanding their real differences—beyond just surface looks—you’re empowered to make plant choices that thrive in your home and lifestyle. References

Ctenanthe vs Stromanthe Read More »

How to Propagate Plants from Stem Cuttings (Step-by-Step)

Introduction to Propagation by Stem Cuttings Propagation by stem cuttings is an accessible, cost-effective, and rewarding method of growing new plants, suitable for home gardeners and plant enthusiasts at every skill level. It involves selecting healthy growth from a parent plant, encouraging the cutting to develop roots, and nurturing it until it becomes independent. This article provides you with a clear, step-by-step guide to successfully propagate plants from stem cuttings, plus helpful insights on environmental conditions like humidity, temperature, lighting, and watering requirements to maximize propagation success. Why Choose Stem Cutting Propagation? Propagation via stem cuttings offers several distinct advantages for home gardeners: Tools and Materials Required Gathering your supplies beforehand ensures a smooth propagation process. Here’s a concise list of essential tools: Step-by-Step Guide to Propagate Plants from Stem Cuttings Step 1: Choose Healthy Parent Plants Always select vigorous, disease-free parent plants with healthy growth, strong foliage, and no visible pests or diseases. Ideally, take cuttings early in the morning when plant cells are firm and hydrated. Step 2: Make Proper Cuts Locate healthy stems with recent growth, preferably softwood or semi-hardwood (young, flexible stems or stems becoming slightly woody). Using sterilized shears, make your cut approximately 4–6 inches in length, just below a node—where leaves and buds emerge. Cut at a 45-degree angle to increase the area for nutrient and moisture absorption, which promotes faster rooting. Step 3: Prepare the Cutting After removing your cutting, promptly trim the bottom foliage, leaving one or two pairs of leaves at the top. Removing lower leaves helps reduce moisture loss and prevents leaves from rotting once inserted into the soil. If large leaves remain, cut them in half horizontally to reduce water loss through evaporation. Step 4: Apply Rooting Hormone (Optional but Recommended) Applying rooting hormone significantly enhances root growth, shortening rooting periods by 1–2 weeks. Simply dip the base (approximately the bottom inch) of the cutting into the powdered or liquid rooting hormone. Remove any excess to avoid fungal infections. Step 5: Insert Cutting into the Growing Medium Fill your small container with moistened rooting medium. Create a small hole (around 2 inches deep) and gently insert the cutting so that at least one node is below the surface. Firmly press the medium around the stem. If rooting multiple cuttings, space them evenly apart—approximately 2–3 inches—to ensure airflow and prevent disease. Step 6: Maintain Proper Humidity and Moisture Levels Immediately after potting, mist the foliage evenly to maintain adequate moisture. If your environment’s humidity is below 50%, cover the pot loosely with a clear plastic bag or dome to maintain humidity levels between 70–90%. Remove the cover briefly daily or every two days for approximately 5–10 minutes to prevent fungal infections and circulate fresh air. Step 7: Provide Appropriate Light and Temperature Place cuttings in a warm, bright location with indirect sunlight (avoiding direct sunlight which can stress and dry out tender cuttings). Provide consistent temperatures of 65–75°F (18–24°C), which encourage quick and healthy rooting. Avoid locations near drafts, heaters, or air conditioners, as extreme temperatures hinder root development. Step 8: Wait and Monitor Root Development Root development typically occurs within 2–6 weeks, varying based on plant type, species, and growing conditions. Regularly monitor cuttings by lightly tugging the stem after 3 weeks. Resistance indicates successful root formation. Avoid disturbing the cutting unnecessarily to prevent root damage. Step 9: Transplant to Individual Containers Once robust root systems have developed (typically after 4–6 weeks), transplant cuttings to individual pots with a quality, well-draining potting mixture. Transition cuttings gradually to their new habitat, progressively introducing brighter indirect sunlight and adapting to lower humidity. Post-Propagation Care Conditions Watering and Humidity Initially, soil should be kept slightly moist but never oversaturated. Overwatering risks root rot and fungal diseases. Ensure excellent drainage and watering only as necessary. Maintain humidity at around 50–70% after propagation to ensure stable growth. Lighting Newly rooted plants prefer locations receiving indirect bright light, ideally providing around 10,000–15,000 lux intensity. Gradually adjust plants to brighter lights over several weeks depending on species requirements—avoid sudden changes, which may overwhelm young plants. Temperature and Air Circulation Maintain optimal growing room temperatures between 60–80°F (15–26°C). Proper air circulation reduces fungal infections, insects, and diseases. Ensure adequate airflow but avoid direct drafts. Nutrient Requirements Newly rooted plants require only mild feeding. After 4–6 weeks post-transplantation, fertilize sparingly with a balanced, diluted fertilizer (use ¼ to ½ of the recommended strength initially) to support healthy growth without stressing developing root systems. Common Plants Suitable for Stem Cutting Propagation While many plants respond exceptionally well to stem cutting propagation, these common choices are particularly well-suited to beginners: Conclusion Propagation via stem cuttings offers valuable opportunities for beginners and experienced plant enthusiasts alike to expand their garden collection cost-effectively and sustainably. Proper care ensures successful rooting with healthy growth, following precise techniques and environmental guidelines outlined above. Garden enthusiasts seeking quick, simple propagation methods with high success rates will find stem cuttings immensely beneficial. References

How to Propagate Plants from Stem Cuttings (Step-by-Step) Read More »

Top 10 Low-Light Indoor Plants

Indoor plants don’t just make a space look beautiful—they also improve air quality, boost your mood, and add life to even the darkest corners of your home. But choosing the right plant can be daunting, especially if you’re short on time, experience, or natural sunlight. That’s why we’ve put together a practical guide to the Top 10 Indoor Plants for Low-Light Homes. Whether you live in a shaded apartment, have windowless bathrooms, or simply want easygoing greenery to brighten up your home, this list is designed for you. Each plant listed below thrives in lower-light conditions (under 1000 lux) and offers unique benefits, from being safe around pets to requiring minimal maintenance. Let’s dig in and find the perfect plant friend for your space. 1. Snake Plant (Sansevieria trifasciata) 2. ZZ Plant (Zamioculcas zamiifolia) 3. Pothos (Epipremnum aureum) 4. Cast Iron Plant (Aspidistra elatior) 5. Peace Lily (Spathiphyllum spp.) 6. Chinese Evergreen (Aglaonema spp.) 7. Heartleaf Philodendron (Philodendron hederaceum) 8. Parlor Palm (Chamaedorea elegans) 9. Spider Plant (Chlorophytum comosum) 10. Fernwood Mikado Sansevieria (Sansevieria cylindrica ‘Fernwood’) Conclusion You don’t need a sunny windowsill or a green thumb to enjoy indoor plants. With the right species, even poorly lit rooms can become lush, thriving environments. Start with one or two from the list above, and build your confidence—and your indoor jungle—from there. References

Top 10 Low-Light Indoor Plants Read More »