Leaf Lee

Episcia 'Picasso' , pink foliage episcia with pink leaves

Comprehensive Guide to Pink-Foliage Episcia: Cultivars, Leaf Traits, and Care

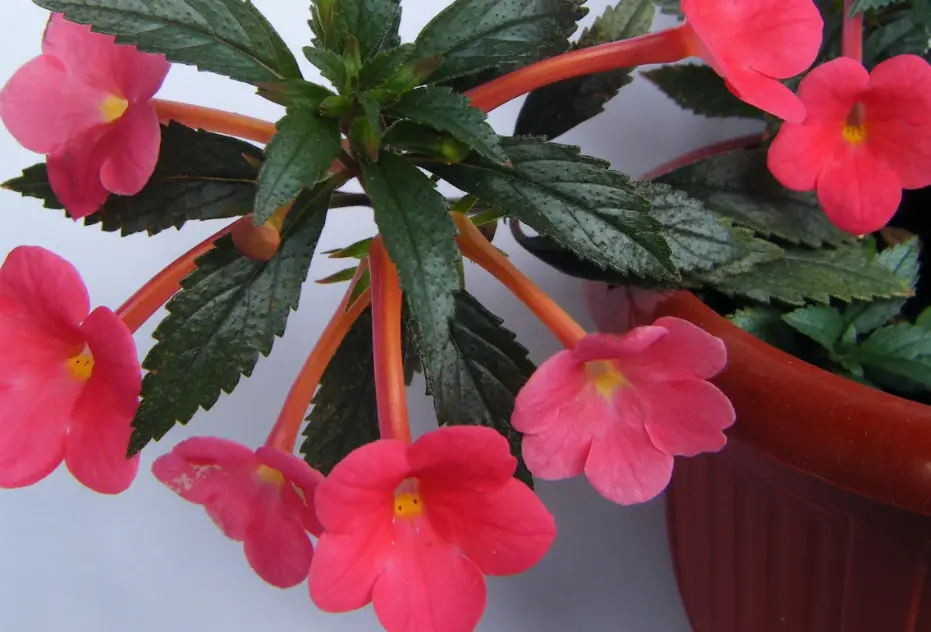
Episcia, a genus within the Gesneriaceae family, are tropical perennials prized for their vividly colored and textured leaves. While Episcia do produce small, tubular flowers (often red, orange, or violet), their primary ornamental value lies in their ornamental foliage. Among these, pink-foliage cultivars like ‘Picasso’, ‘Pink Smoke’, and ‘Cleopatra’ are especially valued by collectors for their soft pink hues and intricate variegation. This guide provides a detailed overview of pink-foliage Episcia, including their cultivars, growing conditions, and care strategies. 1. Botanical Overview Episcia are stoloniferous perennials that spread via runners. Native to the understory of tropical forests in Central and South America, they thrive in warm, shaded, and humid environments. They are closely related to African violets (Saintpaulia) and Achimenes, but are distinct in habit and appearance. Taxonomic Summary Characteristic Detail Family Gesneriaceae Genus Episcia Common Names Flame Violet, Carpet Plant Growth Form Stolons (runners), groundcover Native Range Central and South America 2. What Are Pink-Foliage Episcia? Pink-foliage Episcia cultivars are selected for their blush tones, pink speckling, or rose-colored variegation on their leaves. Unlike green-dominant or bronze cultivars, these types are grown specifically for foliage interest rather than floral performance. These plants are especially popular in East and Southeast Asia under collector categories like pink brocade foliage or colorful foliage Episcia 3. Notable Pink-Foliage Episcia Cultivars Below is a list of popular pink- or pink-variegated Episcia cultivars, their foliage traits, and collector notes: Cultivar Name Leaf Description Notes Episcia ‘Picasso’ Gray-green leaves with pink to lavender margins and veins Highly decorative; compact spreader Episcia ‘Pink Smoke’ Pale green leaves with diffuse pink and silvery overlay Needs bright indirect light Episcia ‘Cleopatra’ Cream and pink blotches on olive green; puckered texture Slightly larger leaves; dramatic look Episcia ‘Silver Skies’ Silver foliage with faint pink tones Grows well in terrariums Episcia ‘Tropical Topaz’ Light pink and cream variegation with a golden undertone Best color under cool white LED light These cultivars are propagated vegetatively to retain leaf patterns. Tissue culture and stolon cuttings are the most common propagation methods. 4. Foliage vs. Flowering Traits Although Episcia do flower, the focus in these cultivars is clearly on foliage. Flowers tend to be small and short-lived, with color often contrasting or complementing the leaves. Feature Flower-Focused Cultivars Foliage-Focused Cultivars Primary Appeal Bright blooms Variegated or pigmented leaves Flower Color Red, orange, violet Secondary to foliage Foliage Color Range Mostly green Pink, cream, silver, rose Flower Duration Weeks Short, seasonal Collectability Moderate High in Asian foliage markets 5. Growing Conditions for Pink-Foliage Episcia Episcia thrive in warm, humid, and shaded conditions. Their thin leaves and variegation make them sensitive to environmental extremes. Parameter Ideal Condition Light Bright, filtered light (no direct sun) Temperature 20–28°C Humidity 70–85% preferred Watering Keep soil moist but never soggy Soil Light, airy mix (peat + perlite or sphagnum) Fertilizer Low-nitrogen balanced feed monthly Too much direct sunlight can fade or burn pink variegation, while dry air causes leaf curl or edge crisping. 6. Seasonal Growth and Maintenance Episcia are evergreen and do not undergo dormancy like Achimenes. However, their growth slows in cooler months. Spring–Summer Autumn–Winter 7. Propagation Methods A. Stolons (Runners) B. Leaf Cuttings C. Division 8. Common Challenges and Fixes Issue Cause Remedy Faded pink coloration Low light or nutrient imbalance Move to brighter filtered light Leaf burn or browning Direct sun or dry air Add shade, boost humidity Root/stolon rot Overwatering or heavy soil Use airy mix, reduce water Mites or thrips Poor air circulation Use neem oil or insecticidal soap 9. Display and Styling Tips 10. References and Further Reading Episcia cultivars with pink or multicolored foliage offer year-round ornamental value, making them an ideal addition for collectors and interior plant stylists. With the right balance of humidity, warmth, and light, they reward growers with lush carpets of textured leaves that rival even the showiest flowers. If you’re looking for a low-growing, high-impact houseplant, pink-foliage Episcia are among the most rewarding choices.

Comprehensive Guide to Pink-Foliage Episcia: Cultivars, Leaf Traits, and Care Read More »

Achimenes with pink flowers

How to Care Achimenes with pink flowers?

Achimenes is a genus in the Gesneriaceae family, comprising tropical, rhizomatous perennials valued for their vibrant, tubular flowers and trailing habit. Native to Central and South America, these plants have become popular worldwide as ornamental flowering houseplants. This guide focuses specifically on pink-flowered cultivars of Achimenes—highlighting their taxonomy, horticultural varieties, care requirements, propagation methods, and common challenges. 1. Botanical Background: What Are Achimenes? Achimenes are herbaceous perennials that grow from scaly rhizomes. In the wild, they occur in warm, humid forest margins, often as groundcovers or trailing plants. The genus contains roughly 25–30 species, most of which have been hybridized extensively. Taxonomic Summary Characteristic Detail Family Gesneriaceae Genus Achimenes Common Names Hot Water Plant, Cupid’s Bower, Widow’s Tears Native Range Mexico to northern South America Growth Type Rhizomatous herbaceous perennial Key wild species used in hybridization include: 2. Understanding Achimenes with pink flowers In cultivation, the term “pink Achimenes” refers to hybrids and selections with pink blooms. These are not a botanical group but a horticultural category. Pink Achimenes are bred primarily for ornamental purposes and may exhibit a wide range of flower forms, colors, and plant sizes. Common Traits of Pink-Flowered Hybrids Trait Range Flower Color Light pink, blush, coral, rose, peach Foliage Medium to dark green, sometimes silver-hued Flower Size 2.5–5 cm in diameter Habit Trailing to semi-upright Bloom Season June–September (sometimes October) 3. Notable Pink Cultivars and Lineage Below is a table of well-known pink Achimenes cultivars, their known parentage (where available), and notable traits: Cultivar Name Parentage Flower Description Notes Achimenes ‘Pink Nightshade’ Unknown hybrid Pale pink with magenta throat Free-flowering, trailing Achimenes ‘Ambroise Verschaffelt’ Likely A. longiflora hybrid Rose-pink, slightly ruffled Compact grower Achimenes ‘Seraphine’ Hybrid origin Blush-pink, light eye High bloom density Achimenes ‘Hilda’s Pink’ Hybrid origin Light pink with white center Early season bloomer Achimenes ‘Pretty Polly’ Hybrid origin Coral pink, uniform color Vigorous trailing stems Achimenes ‘Coral Gem’ Hybrid origin Salmon-pink Large flowers These cultivars are available through specialty nurseries and are often featured in indoor plant shows and collections. Growth Requirements and Environmental Conditions Achimenes are relatively undemanding if grown under appropriate conditions. Below is a table summarizing optimal environmental requirements: Parameter Recommended Conditions Light Bright, indirect light; shade from midday sun Temperature 18–26°C during active growth Humidity 60–80% relative humidity Watering Keep soil lightly moist in summer; stop watering in dormancy Soil Peat-based mix with perlite or vermiculite; pH 5.5–6.5 Fertilization Balanced or high-phosphorus fertilizer biweekly in summer Dormancy Induced by shorter day length or cooler temperatures below 13°C Seasonal Care Cycle Spring (Initiation) Summer (Active Growth) Autumn (Transition) Winter (Dormancy) Propagation Methods Explained Achimenes propagate readily from rhizomes and stem cuttings. A. Rhizome Propagation Stem Cuttings (Less Common) Flower Color Variability Pink Achimenes range from: Color intensity can be influenced by light exposure, temperature, and soil fertility. Cooler temperatures tend to deepen flower pigmentation. Pests, Diseases, and Troubleshooting Symptom Likely Cause Treatment Yellowing leaves Overwatering or compacted soil Improve drainage, water less No blooming Insufficient light or excess nitrogen Move to brighter spot, switch to bloom formula Powdery mildew High humidity and poor air flow Remove affected leaves, increase ventilation Spider mites or aphids Dry air or infestation Treat with insecticidal soap or neem oil Rhizome rot Waterlogged soil or poor storage Use sterile mix, dry storage only Preventative care includes rotating plants, avoiding overhead watering, and keeping tools sanitized. Frequently Asked Questions (FAQ) Q1. Can I grow Achimenes outdoors?Yes, in containers or shaded beds during the warm season. Bring indoors before temperatures drop below 13°C. Q2. How long do Achimenes flower?Most cultivars bloom for 8–12 weeks continuously in summer with regular care. Q3. Can I force Achimenes to stay evergreen?No. They require a dormant period to store energy for the next growing season. Q4. How long do rhizomes stay viable?Properly dried rhizomes can be stored for 6–9 months in cool, dry conditions. References and Further Reading

How to Care Achimenes with pink flowers? Read More »

Variedad de anthuriums plant family

Araceae (Aroids): A Complete Care Guide & Problem Fixes for Popular Indoor Plants

1. What Is Araceae? Understanding the Aroid Family The Araceae family—commonly called aroids—includes over 140 genera and approximately 3,700–4,000 species, mostly tropical plants (Pistils Nursery, Wikipedia) (Pistils Nursery). Characterized by their unique spadix and spathe flower structures, they are widely appreciated as ornamental houseplants. Notable aroid genera include Monstera, Philodendron, Anthurium, Spathiphyllum (Peace Lily), Alocasia, Dieffenbachia, Rhaphidophora, etc. They are prized for bold foliage, easy care, and adaptability to indoor environments. 2. Core Care Principles for Aroids 2.1 Light 2.2 Soil Mix 2.3 Watering 2.4 Humidity & Temperature 2.5 Fertilizing 2.6 Plant Maintenance 3. Species-Specific Care Examples 3.1 Monstera deliciosa (“Swiss Cheese Plant”) 3.2 Philodendron (e.g., P. gigas, Birkin, Pothos etc.) 3.3 Anthurium (Flamingo Flower) 3.4 Peace Lily (Spathiphyllum) 4. Common Issues & Their Fixes 4.1 Root Rot (Soft, yellowing, wilting foliage) 4.2 Leaves Yellowing or Curling 4.3 Brown Leaf Tips or Edges 4.4 Leggy/Stretched Growth 4.5 Pests: Mealybugs, Scale, Spider Mites, Thrips 4.6 Fertilizer Burn 5. FAQs (What People Often Ask) Q1: Are aroids toxic? Yes, most Araceae contain calcium oxalate crystals causing oral irritation, drooling, vomiting, and swelling if ingested—be cautious with pets and children, especially with Dieffenbachia and Peace Lily (Wikipedia, Real Simple Peace Lily) (Pistils Nursery, Real Simple). Q2: How often should I water my peace lily/philodendron? Peace Lily: when top inch dries. Philodendron: when top inch dry; less in winter. Always check soil rather than follow strict schedule (The Spruce, The Spruce Philodendron) (The Spruce). Q3: Why aren’t my Anthuriums flowering? Often due to too little indirect light, incorrect fertilizer, or low humidity. Provide bright-filtered light, phosphorus-rich feeding, and humidity above 60% (The Spruce Anthurium guide) (The Spruce). Q4: Are aroids hard to grow? Generally moderate—they tolerate some neglect but need consistent humidity, drainage, and right light. Variegated varieties require more care due to lower chlorophyll and slower growth (Aquarium Coop forum) (Aquarium Co-Op Forum 8. Recommended Reading & References

Araceae (Aroids): A Complete Care Guide & Problem Fixes for Popular Indoor Plants Read More »

How to Adjust Watering Routines Seasonally

How to Adjust Watering Routines Seasonally

Understanding Seasonal Watering Needs Just like us, houseplants respond to seasonal changes. Light levels, temperature, and humidity shift from one season to the next, and those changes directly influence how much water your indoor plants need. Understanding these patterns allows plant lovers to maintain vibrant, healthy greenery all year round. Watering your houseplants isn’t a set-it-and-forget-it routine. Instead, it’s a fluid process (pun intended!) that requires you to observe your plant’s cues and the environment. Let’s break down how to adjust your watering routines based on each season, whether you’re nurturing a lush Monstera or a tidy Pilea. Spring: Waking Up from Dormancy As daylight hours increase and temperatures rise in spring, your houseplants begin to “wake up” from their winter dormancy. This is a time of revival and new growth, and many plants enter a more active growing phase. How to Adjust Watering Increase watering frequency gradually: As the plant’s growth picks up, you’ll likely notice the soil drying out more quickly between waterings. Begin checking soil moisture more often. Watch for signs of growth: New leaves, longer stems, and brighter green hues are signs your plant is ready for more hydration. Match water with energy needs: More photosynthesis means more water use. Just make sure there’s proper drainage to prevent overwatering. Pro Tip: Repotting is commonly done in spring. If you’re repotting a plant, water it lightly the day before and again lightly after transferring—it’ll reduce transplant shock. Summer: Peak Growing Season In summer, most houseplants thrive with extra warmth and light, especially in temperate and tropical climates. But this active season can also put stress on your plants if water needs aren’t met properly. How to Adjust Watering Increase watering frequency: Higher temperatures and faster evaporation mean plants may need water more often—sometimes twice a week depending on the plant and pot size. Check soil daily for thirsty plants: Especially smaller pots or those with thinner foliage like ferns and calatheas. Stick a finger about an inch into the soil; if it feels dry, it’s time to water. Avoid watering during the hottest part of the day: Morning is best, as it allows time for the plant to absorb water before intense midday sun. Watch for signs of underwatering: Wilting, dry edges on leaves, or “curling in” of leaves can be symptoms of needing more frequent hydration. Humidity Matters In many homes, summer indoor air can still be dry due to air conditioning. Consider using a pebble tray or humidifier to keep humidity-loving plants happy, particularly species like prayer plants, orchids, and alocasias. Autumn: Slowing Down As the days become shorter and temperatures drop, plants begin to slow their growth. This change doesn’t mean your plants are in trouble—it’s a natural part of the year’s cycle. But it’s time to readjust your care routines accordingly. How to Adjust Watering Reduce watering frequency gradually: Since growth slows, the plant needs less hydration. Begin spacing out waterings and monitor how long soil stays wet. Watch for mold or fungus gnats: Soil that stays overly moist in cooler weather is an invitation for pests and root rot. Letting soil dry more thoroughly helps prevent this. Use a moisture meter or finger test: If the top 1–2 inches of soil are still damp, wait before watering again. Smart Tip: Plants like succulents, snake plants, and ZZ plants naturally go into deeper dormancy during cooler months. They might only need water every 3–4 weeks starting late fall. Winter: Dormant but Not Dead In winter, most houseplants go dormant or semi-dormant. The limited light, cooler temperatures, and drier indoor air slow down growth significantly. This is the most crucial time to adjust watering, as accidental overwatering during winter is one of the most common ways to harm houseplants. How to Adjust Watering Cut back significantly: Many plants only need watering every 2–4 weeks, depending on species and environment. Prioritize soil dryness: Always test before watering. If soil is even slightly moist, wait a few more days. Be cautious with tropical plants: These may still need water more often if they’re near heat vents or under grow lights, which can dry them out faster. Dealing with Dry Indoor Air Heaters can drastically dry the air inside your home. Some methods to help your plants adapt without overwatering include: Group plants together: This increases local humidity levels. Use a room humidifier: Beneficial especially for ferns, Calatheas, and other moisture-lovers. Add trays of water near radiators: As the water evaporates, humidity rises gently. Tools to Help You Adjust Learning to adjust your watering routine can feel a bit overwhelming at first, but there are several tools and techniques that can help you make sense of it all. Moisture meters: These can provide a quick insight into how wet the soil is below the surface, which is especially helpful with larger pots. Soil types: Plants in fast-draining mixes (like cacti and succulents) dry out faster than those in moisture-retentive soil. Tailor your watering based on soil profile too. Pot material: Terra cotta pots wick away moisture more quickly than plastic or ceramic. A plant in terra cotta will need more frequent watering during growing season. Conclusion: Listen to Your Plants Adapting your watering routine seasonally is all about observation, intuition, and understanding your plant’s needs. There’s no universal watering schedule that works all year round—your snake plant won’t drink the same way in January as it does in July. Be flexible, pay close attention to changes in growth and environment, and use tools that give you better feedback. Think of seasonal watering as a conversation: your plants communicate their needs through signs like leaf color, soil moisture, and overall turgor. When you respond accordingly, you’ll experience fewer issues like root rot, pest outbreaks, or leaf drop. Whether you’re tending to a windowsill full of succulents, a pothos crawling across your bookshelves, or a towering fiddle leaf fig, remember—successful watering isn’t about a calendar, it’s about connection. References Brickell, C., & Joyce, D. (2020). The American Horticultural

How to Adjust Watering Routines Seasonally Read More »

pothos propagation methods in water

How to Propagate Pothos in Water

Introduction to Pothos Propagation Methods Pothos (Epipremnum aureum) is a widely beloved houseplant favored for its beautiful trailing vines, easy care requirements, vigorous growth, and exceptional indoor adaptability. One of the most rewarding aspects of owning pothos plants is their ease of propagation—making it easy for beginners and home gardeners to create more plants from a healthy parent plant. Propagating pothos in water is one of the simplest propagation techniques, making it ideal even if you have minimal experience with houseplants. This article will guide you through a detailed step-by-step approach, explaining the required tools, environmental conditions, care specifics, and timelines needed to propagate healthy and successful pothos plants in water. Tools and Materials Needed Before starting the propagation process, it is practical to gather all necessary tools and materials. Here’s what you’ll need: Step-by-Step Guide for Propagating Pothos in Water Step 1: Select and Prepare the Parent Plant Begin by carefully inspecting your pothos plant to select which vines will serve best for propagation. Opt for healthy stems showing active growth and no signs of disease or pests. Ideally, each cutting should have at least four to six leaves, with visible nodes (small knobby areas where leaves and roots sprout along the stem). Step 2: Prepare Your Cutting Tools Disinfect your pruning shears or scissors using isopropyl alcohol or a diluted bleach solution to minimize the risk of introducing pathogens to your pothos. Clean blades will ensure your propagation is healthy and free from infections. After disinfecting, thoroughly dry the blades with a clean towel or disposable paper towel. Step 3: Take Your Cuttings Cut each selected vine approximately 4–6 inches (10–15 cm) long, ensuring every cutting includes at least two or three leaves and two nodes. Nodes are essential for root production and are easily recognizable as swollen points along the stem from which leaves and roots emerge. Always make a clean, angled cut at about ½ inch (1.3 cm) below a node. This angled cut maximizes the possibility of water absorption and root development. Step 4: Remove Lower Leaves Carefully remove any lower leaves from the bottom portion of the cuttings, as these could rot when submerged in water. Ensure that at least two to three leaves remain at the top of each cutting. Removing lower leaves gives clear access to the node area, increasing the likelihood of rapid root development. Step 5: Position Cuttings in Water Place the prepared pothos cuttings into a clear glass or jar filled with room-temperature filtered or distilled water. The water level should be sufficient to submerge at least one node entirely. Keeping nodes consistently underwater encourages effective root growth. Avoid overcrowding by only including three to five cuttings per container to maintain water freshness and airflow. Step 6: Provide Ideal Conditions for Root Growth Pothos cuttings thrive under specific environmental conditions. Optimal conditions significantly increase your chances of success and encourage faster, healthier root growth: Step 7: Monitor Root Growth Within approximately 2–4 weeks you will begin observing small white roots emerging from the submerged nodes. Healthy pothos roots should appear pale, firm, and bright white in color. Routinely inspect the cuttings for any signs of rot or fungus—promptly remove unhealthy specimens from the propagation area. Step 8: Transition from Water to Soil (Optional) Once roots are well-developed (typically 2–3 inches, or 5–7 cm in length), you may choose to transfer your pothos into soil for continued growth as a soil-planted houseplant. To successfully transition pothos: Common Issues and Solutions in Pothos Propagation Slow or No Root Growth Stem or Leaf Rot Algae Build-Up in Jar or Glass Container Benefits of Propagating Pothos in Water Compared to Other Methods Water propagation offers several advantages over traditional soil-based pothos propagation methods: Conclusion Propagating pothos plants in water is an easy, efficient, and cost-effective approach suitable even for beginner plant enthusiasts and home gardeners. By following each step clearly, providing optimal environmental conditions, and routinely monitoring the water quality, your pothos plant will thrive and rapidly root—generally in just 2–4 weeks. Both indoor gardening novices and more experienced houseplant lovers will benefit considerably from the tried-and-true water propagation method, allowing them to economically expand their pothos collections and improve their indoor gardening skill set. References

How to Propagate Pothos in Water Read More »

ZZ plant vs peace lily

ZZ Plant vs Peace Lily

ZZ Plant vs Peace Lily: What’s the Difference and Which Should You Choose? ZZ Plant (Zamioculcas zamiifolia) and Peace Lily (Spathiphyllum spp.) are two of the most popular indoor plants for beginner gardeners—and it’s easy to see why. Both flourish in indoor settings, tolerate low light, and have sleek green foliage that adds life and elegance to homes and workspaces. However, despite their shared use and appearance at a glance, they come from completely different plant families and have very different care needs and aesthetic qualities. Many indoor plant lovers often confuse the ZZ Plant and Peace Lily, especially when shopping for a hardy low-light plant that doesn’t require a lot of attention. Yet the differences are significant and can affect how well the plant fits your space and lifestyle. This side-by-side comparison helps demystify the differences and highlights what makes each plant unique, so you can make an informed choice that suits your needs. ZZ Plant vs Peace Lily: Quick Comparison Table Feature ZZ Plant Peace Lily Botanical Name / Family Zamioculcas zamiifolia / Araceae Spathiphyllum wallisii (common species) / Araceae Native Region Eastern Africa (Kenya to South Africa) Tropical Americas (Colombia to Venezuela) Leaf Shape & Size Glossy, thick, oval-shaped leaflets (4–6 inches long) Pointed, soft lance-shaped leaves (6–12 inches long) Growth Habit & Speed Slow-growing, upright; grows 2–3 ft tall Moderate growth rate; bushy, arching; grows 1–3 ft tall Stem Structure / Key Identifier Thick rhizomes; firm upright stems No true stems; leaves emerge from base Light Requirements Low to bright indirect light (100–2,500 lux) Medium to bright indirect light (500–3,000 lux) Watering & Humidity Water every 2–3 weeks; prefers 30–50% humidity Keep soil slightly moist; prefers 50–70% humidity Pet Safety / Toxicity Toxic to cats, dogs, and humans if ingested Toxic to cats and dogs (calcium oxalate) Availability / Price Widely available; $20–40 depending on size Very common; $10–25 depending on size Major Differences Explained 1. Visual Identity & Aesthetic Appeal Though both plants have strong visual appeal, their foliage differs significantly when viewed up close. The ZZ Plant showcases shiny, waxy, dark green leaves arranged symmetrically along thick upright stems, giving it a structured, almost sculptural form. This glossy texture and low profile make it a favorite in modern and minimalist spaces. In contrast, the Peace Lily features softer, larger, more delicate leaves that arch and cascade outward, providing a fuller, more lush appearance. It also develops iconic white flowers called spathes that resemble calla lilies—an ornamental bonus the ZZ Plant doesn’t offer. These blooms can appear several times a year under good conditions, adding seasonal visual interest. 2. Growth Habit and Space Considerations ZZ Plants are upright growers that remain compact for a long period, reaching a mature size of just 2–3 feet tall and wide over several years. Their slow growth and tidy form make them ideal for desks, bookshelves, or tight corners where a neat look is desired. Peace Lilies, by contrast, expand more quickly and spread outward from the base, requiring more floor or table space over time. Their leaves naturally droop and take up more visual volume. 3. Watering Needs and Tolerance One of the biggest practical differences is moisture tolerance. ZZ Plants are drought-tolerant thanks to their subterranean rhizomes that store water. They are happiest when watered infrequently—every 2 to 3 weeks—and they can survive low humidity environments just fine (as low as 30%). This makes the ZZ almost impossible to overwater if you tend to forget watering routines. The Peace Lily, on the other hand, prefers its soil to stay lightly moist and will dramatically wilt when it dries out too much, bouncing back quickly when watered. It thrives in higher humidity (ideally 50–70%), making it a bit higher maintenance, especially in dry indoor environments like heated winter apartments. 4. Lighting Conditions and Adaptability Both plants do well in low to moderate indoor light, but here too, their preferences diverge. ZZ Plants are incredibly adaptable and can tolerate lower light levels (as low as 100 lux) better than almost any indoor plant. This gives them a key advantage in windowless offices, hallways, or dim spaces. Peace Lilies prefer medium to bright indirect light (around 500–3,000 lux) if you want them to bloom. While they tolerate medium light, consistent lower light will suppress flowering and slow overall growth. Their leaves also tend to yellow or droop in extreme low-light conditions. Which One Should You Choose? Selecting between the ZZ Plant and the Peace Lily will depend largely on your environment, care habits, and aesthetic preference. Here are some factors to help guide your choice: Conclusion ZZ Plants and Peace Lilies are both excellent indoor greenery options, but each brings its own strengths and challenges. ZZ Plants win on low-maintenance hardiness and architectural charm, while Peace Lilies shine in lush foliage and elegant flowering. Neither is particularly demanding, but your home’s light level, humidity, available space, and time for care will largely dictate which one is better for your situation. When in doubt, consider starting with a ZZ Plant if you’re a forgetful waterer or dealing with a darker room. Opt for a Peace Lily if you can provide steady moisture and want the added beauty of blooms. Whichever you choose, both plants reward your care with long-lasting vitality and beauty indoors. References

ZZ Plant vs Peace Lily Read More »

Snake Plant vs zz plant

Snake Plant vs ZZ Plant

Snake Plant vs ZZ Plant: Which One Belongs in Your Home? The Snake Plant (Sansevieria, now reclassified as Dracaena trifasciata) and the ZZ Plant (Zamioculcas zamiifolia) are two of the most popular houseplants today—and for good reason. They’re both charmingly architectural, incredibly tough, and famously hard to kill. With striking upright foliage, tolerance for low light, and low-maintenance nature, it’s no wonder they’re often found side-by-side in plant shops and Pinterest-ready living rooms. Due to their similar roles in interior decor and care level, many beginner gardeners confuse the two or wonder which one is better suited to their home. But despite their similar reputations and appearances, these two plants have quite distinct biological roots, growth patterns, and visual personalities. This guide breaks down the Snake Plant vs ZZ Plant to help you choose the perfect green companion for your space. Quick Comparison Table: Snake Plant vs ZZ Plant Feature Snake Plant ZZ Plant Botanical Name & Family Dracaena trifasciata (formerly Sansevieria), Asparagaceae Zamioculcas zamiifolia, Araceae Native Region West Africa (Nigeria to Congo) Eastern Africa (Kenya to South Africa) Leaf Shape & Size Flat, sword-like leaves; 30–150 cm tall Thick, waxy, oval leaflets on stalks; 40–90 cm tall Growth Habit & Speed Upright rosette; moderate growth, 10–20 cm/year Clumping stems from rhizomes; slow growth, 5–10 cm/year Stem Structure No above-ground stems; leaves arise directly from soil Thick stalks with compound leaves; rhizomatous base Light Requirements Low to bright indirect (500–2000 lux) Low to medium indirect (250–1000 lux) Watering & Humidity Water every 2–3 weeks; tolerates 30–50% RH Water every 3–4 weeks; prefers 40–60% RH Pet Safety / Toxicity Toxic to cats and dogs (saponins) Toxic to cats and dogs (calcium oxalates) Typical Price & Availability Widely available; $10–$40 depending on cultivar/size Moderately available; $15–$50 depending on size Key Differences Between Snake Plant and ZZ Plant Visual Identity: Architectural Spikes vs Glossy Arches At first glance, both plants have a strong structural presence, making them staples in modern interior design. However, their leaves are radically different upon closer inspection. The Snake Plant features long, flat, sword-like leaves that grow vertically from the base and often display variegation in green, yellow, or silver tones. Some cultivars, like ‘Laurentii’ or ‘Moonshine,’ are prized for their leaf color and vertical form. In contrast, the ZZ Plant has thick, succulent, dark green leaflets arranged on arching stalks. These shiny, waxy leaves give it a polished, almost plastic appearance—perfect for minimalist or contemporary decor. While the Snake Plant commands attention with sharp lines, the ZZ Plant feels softer and more rhythmic, swaying gently as it grows. Growth Habit and Space Suitability The Snake Plant’s leaf-forward growth means it tends to stay upright and contained, making it ideal for corners or narrow spaces where horizontal sprawl isn’t welcome. With some varieties reaching heights over 1 meter, larger Snake Plants can serve as bold visual anchors in a room. The ZZ Plant grows from underground rhizomes and produces wider, arching stalks, giving it a bushier silhouette. Though it rarely exceeds 90 cm in height, its expanding base can gradually fill out a wider footprint. For tabletops or mid-height stands, the ZZ Plant is a charm—elegant, but not overwhelming. Care Difficulty and Environmental Preferences Both plants rank among the easiest houseplants to maintain, especially for beginners. Still, their subtle differences matter. The Snake Plant is slightly more adaptable to different lighting situations, tolerating both full sun and deep shade, whereas the ZZ Plant has a stronger preference for low-light environments and may suffer in bright, direct sun. When it comes to watering, both prefer to dry out between drinks, but the ZZ Plant is more drought-tolerant due to its rhizomes, which store water over longer periods. Snake Plants may rot with overwatering but appreciate a bit more moisture if light and temperature conditions are higher. Likewise, while neither plant is fussy about humidity, the ZZ Plant prefers moderate levels (40–60% RH), especially in dry indoor air. Toxicity and Pet Considerations Unfortunately, both Snake Plants and ZZ Plants are toxic to pets. Snake Plants contain saponins that can cause nausea, vomiting, or diarrhea in cats and dogs if ingested. ZZ Plants contain calcium oxalate crystals, which may irritate the mouth and stomach lining. For households with curious pets, these plants should be kept well out of reach or avoided in favor of truly pet-safe alternatives like Calatheas or Spider Plants. Which One Should You Choose? If you’re torn between the Snake Plant and ZZ Plant, the right choice often depends on your space, aesthetic goals, and lifestyle. Here are some tailored recommendations: Conclusion In the battle of low-maintenance indoor heroes, both the Snake Plant and ZZ Plant shine in their own right. They’re reliable, attractive, and practically indestructible with minimal care. But while they share similar reputations, their looks, growth styles, and subtle needs make them better suited to slightly different roles in your home. Choose a Snake Plant if you’re looking for a clean, modern visual with height and minimal spread. Opt for a ZZ Plant if you want a glossy showpiece container plant that tolerates occasional neglect. Either way, your living room, office, or bedroom gains a resilient companion that keeps the air cleaner and the vibe greener. References

Snake Plant vs ZZ Plant Read More »

zz plant

ZZ Plant

ZZ Plant: The Low-Maintenance Legend of Indoor Gardening If you’re new to houseplants or looking for a nearly indestructible companion for your indoor jungle, the ZZ Plant (Zamioculcas zamiifolia) might just be your perfect match. With its glossy leaves, fuss-free care requirements, and ability to thrive in low light, the ZZ Plant has earned its reputation as a top choice for both plant novices and seasoned enthusiasts. In this guide from Leaf Plant Garden, we’ll explore what makes the ZZ Plant so special, how to care for it throughout the year, and tips for keeping it healthy and happy indoors. Meet the ZZ Plant Native to Eastern Africa, the ZZ Plant is a tough, rhizomatous perennial known for its waxy, dark green leaves that can brighten up even the dimmest corners of your home. While it may appear delicate with its polished leaflets, beneath the surface it’s storing energy in potato-like rhizomes that help it survive long periods of drought. Some quick highlights: Botanical name: Zamioculcas zamiifolia Common names: ZZ Plant, Zanzibar Gem, Eternity Plant Light requirements: Low to bright indirect light Water needs: Low – drought-tolerant Growth habit: Upright, clumping form (up to 2-3 feet tall) Why the ZZ Plant is Perfect for Beginners Some indoor plants can be temperamental, but the ZZ Plant is widely celebrated for being low-maintenance and incredibly forgiving. Here’s why it’s adored by beginners and busy plant lovers alike: Tolerates low light: Ideal for offices, bathrooms, and rooms with minimal sunlight. Drought-resistant: Stores water in its rhizomes, so it doesn’t mind if you forget to water it now and then. Air-purifying: According to NASA’s Clean Air Study, it can help remove toxins like benzene and xylene from indoor air. Minimal pest issues: It’s rarely affected by common indoor plant pests. How to Care for Your ZZ Plant Though hardy, a little care goes a long way in keeping your ZZ Plant looking its best. Let’s dive into the key elements of ZZ Plant care: Light Requirements ZZ Plants are one of the few houseplants that do well in almost any light condition. However, they shine their brightest when provided with medium to bright indirect light. Low light: Suitable, but growth may be much slower. Bright indirect light: Optimal for healthy, lush foliage and regular new growth. Avoid direct sun: Direct rays can scorch the leaves, turning them yellow or brown. Leaf Plant Garden Tip: Rotate your ZZ Plant every few weeks to promote even growth and prevent leaning toward the light. Watering Your ZZ Plant The biggest threat to ZZ Plants is overwatering. Their rhizomes act as natural reservoirs, so they won’t get thirsty quickly. Water once every 2–3 weeks: Or when the top 2–3 inches of soil feels dry. Less is more: Underwatering is better than overwatering for this plant. Well-draining soil: Use a cactus or succulent mix, or amend potting soil with perlite or sand. Warning: Always empty the saucer after watering to avoid root rot—a common issue caused by water accumulating at the bottom. Humidity and Temperature ZZ Plants are not too picky about humidity and easily adapt to typical indoor levels. However, they prefer warm temperatures between 65°F and 80°F (18°C to 27°C). Keep out of cold drafts: Avoid placing it near air conditioners or cold windows in winter. Minimum temperature: Don’t expose to temps below 45°F (7°C). Feeding and Fertilizing While ZZ Plants aren’t heavy feeders, fertilizing during the growing season (spring and summer) can encourage new growth. Use a balanced houseplant fertilizer: Once a month, diluted to half strength. No need in winter: The plant rests and won’t require extra nutrition during the colder months. Repotting and Growth ZZ Plants grow slowly but steadily. They typically need repotting every 2–3 years, or when roots or rhizomes start crowding the pot. Best time to repot: Early spring, before the active growth season begins. Signs it’s time: Roots coming out of drainage holes, slowed growth, or water draining too quickly. Tip: Choose a pot that’s only an inch or two wider than the current one and be sure it has drainage holes. Common Issues and How to Fix Them ZZ Plants are hardy, but not invincible. Keep an eye out for these common issues: Yellowing Leaves Cause: Often a sign of overwatering. Solution: Let the soil dry out completely before watering again and ensure drainage is adequate. Brown Tips Cause: Low humidity or buildup of salts from tap water. Solution: Use filtered or distilled water, and occasionally flush the soil with clean water to remove salts. Drooping Stems Cause: Overwatering or root rot. Solution: Check roots for rot, remove affected parts, and repot in fresh, dry soil if necessary. Pest Problems Though rare, ZZ Plants can sometimes attract pests like spider mites or scale insects. Prevention and Control: Wipe leaves with a damp cloth regularly to remove dust and spot pests early. Use neem oil or insecticidal soap if pests are detected. Pet Safety Note While the ZZ Plant is beautiful and easygoing, it’s important to note that it is considered toxic to pets and humans if ingested. The plant contains calcium oxalate crystals, which can cause irritation. Keep out of reach from curious cats, dogs, or small children. Wash hands after handling, especially when pruning or repotting. ZZ Plant Propagation If you’re feeling adventurous, you can try propagating your ZZ Plant to share with friends or expand your own collection. It’s a slow process but rewarding for patient gardeners. Methods of Propagation: Leaf cuttings: Snip a healthy leaf (with stem), allow it to callous over, and plant it in moist soil or place in water. Rhizomes take weeks to form. Division: The fastest and most reliable method. When repotting, separate the rhizomes and plant each in its own container. Conclusion: The Timeless Appeal of ZZ Plants Whether you’re tight on time, living in a low-light apartment, or uncertain about your “green thumb,” the ZZ Plant is a true friend in the world of indoor plants. Its graceful appearance,

ZZ Plant Read More »

leggy plant

What Causes Leggy Plants and How to Fix It

Understanding the Problem: What Does It Mean When a Plant is Leggy? Have you ever noticed one of your once bushy houseplants becoming stretched out, sparse, and floppy, with long stems and fewer leaves? If so, your plant has likely become “leggy.” A leggy plant has elongated stems and a top-heavy appearance, often looking weak or unbalanced. While legginess doesn’t necessarily mean your plant is dying, it’s a clear sign that it’s not thriving either. Legginess is a common issue, particularly for indoor plant lovers. But the good news is that it’s entirely preventable and fixable with some changes in care practices. In this guide, we’ll explore what causes plants to become leggy and share practical steps to help restore their compact and healthy shape. Main Causes of Leggy Growth in Houseplants To prevent or correct legginess, it helps to understand its root causes. Here are the most common culprits behind leggy growth: 1. Inadequate Light By far the most common cause of leggy indoor plants is insufficient light. Plants use light to photosynthesize and produce energy. When light is inadequate, a plant will naturally stretch toward the closest light source, leading to long internodes (the spaces between leaves) and weak growth. Common signs of light deficiency include: Plant leaning or growing toward a window Wide gaps between leaves Pale or smaller new growth 2. Seasonal Changes During fall and winter, natural light levels drop, and the sun is lower in the sky. Even plants that thrived during summer may start to stretch if they aren’t getting enough light during the darker months. Growth naturally slows in winter, but legginess occurs when a plant tries to grow with inadequate light supply. 3. Over-Fertilizing Excessive use of fertilizers, especially high-nitrogen types, can lead to fast but weak and stretched growth. While it’s tempting to feed your plants often, too much fertilizer stimulates soft, tall shoots without the structural strength or foliage density to support them. 4. Crowded or Improper Pruning Without regular pruning, some plants tend to focus their energy upward, resulting in tall but sparsely leafed stems. Also, if a plant is crowded with others, it may compete for light and grow tall and leggy as it tries to outgrow its neighbors. How to Fix Leggy Plants Once you’ve identified leggy growth in your houseplants, the next step is to take corrective action. Here are practical tips to restore your plants to their lush, compact glory: 1. Improve Lighting Conditions This is the most effective fix for leggy plants. Every plant species has its own light preferences, so it’s important to match their needs. Here’s how you can improve lighting: Move closer to a window: East- and south-facing windows offer the best light for most popular houseplants. Supplement with grow lights: In dark rooms or winter months, use full-spectrum LED grow lights to ensure consistent lighting. Rotate your plant regularly: Turn your plant every week to ensure even light exposure and prevent it from leaning toward one side. Pro Tip: For plants like succulents, herbs, and flowering varieties, bright light for at least 6 hours a day is ideal. Foliage plants like pothos and peace lilies can tolerate lower light but still need bright indirect light to grow compactly. 2. Prune Strategically Pruning helps control the height of leggy plants and encourages bushier growth from the base and sides. When done properly, pruning stimulates new branches and balances the plant’s shape. Use sharp, sterilized scissors or pruning shears. Cut just above a leaf node (the point on the stem where a leaf is attached). Remove excessively long stems or those that aren’t producing healthy leaves. After pruning, your plant may look smaller, but don’t worry—it will soon reward you with fuller growth. 3. Pinch Back Growth Regularly Pinching is a gentler form of pruning best suited for herbs, coleus, and other soft-stemmed plants. Simply use your fingers to pinch off the tip of a growing stem to encourage two new branches to form. This helps the plant become bushier over time. 4. Optimize Fertilizer Use If you’ve been overfeeding your plants, back off on the fertilizer. As a general rule: Use a balanced liquid fertilizer diluted to half strength during the active growing season (spring–summer). Avoid feeding plants in winter when growth slows down naturally. Choose slow-release fertilizers for a more consistent nutrient supply. 5. Repot or Divide When Needed If your plant has outgrown its container, the roots may be crowded, leading to poor nutrient and water absorption. This can affect leaf development and encourage legginess. Look for signs like roots growing out of the drainage holes or sluggish growth even with good care. Repot into a container 1–2 inches larger than the current one, using fresh, appropriate soil. Alternatively, divide plants like spider plants or ZZ plants to refresh growth. Preventing Leggy Growth From the Start It’s always easier to prevent legginess than to fix it. Whether you’re growing trailing vines, leafy tropicals, or bushy herbs, here are key tips to encourage healthy, compact growth from the beginning: Choose light-loving locations: Keep light in mind when choosing where to place a plant. A bright, indirect spot near a window is ideal for many indoor species. Maintain a regular pruning schedule: Pruning isn’t only for repair—it can be part of healthy plant grooming that keeps your plants in top shape. Group plants strategically: Avoid overcrowding plants so they don’t have to compete for light and airflow. Watch for seasonal adjustments: Expect growth patterns to change with the seasons. Move light-hungry plants closer to windows during winter or add supplemental lighting as needed. Rotate regularly: Give all sides equal sun exposure to promote symmetrical growth. Conclusion While leggy plants may seem like an eyesore or a frustrating problem, remember that it’s a natural response to specific care conditions—most frequently, a lack of light. By paying attention to your plant’s environment and making a few strategic changes, you can encourage lush, healthy, and attractive growth. Whether it’s repositioning for better

What Causes Leggy Plants and How to Fix It Read More »

root rot issue indoor plants

Dealing with Root Rot in Indoor Plants

Understanding Root Rot: A Hidden Threat to Indoor Plants Root rot is one of the most common and destructive issues indoor plant enthusiasts face. Often sneaking up without warning, this problem can turn a healthy, thriving houseplant into a wilted mess in just a few days. The tricky part? It’s happening underground, where it’s not immediately visible. But learning to recognize, prevent, and treat root rot can save your plants and help you grow your indoor jungle with confidence. What Is Root Rot and What Causes It? Root rot is a disease affecting the roots of plants, generally caused by one of two things: excess moisture or harmful fungi and bacteria. These culprits thrive in overly wet, poorly aerated soil, attacking the roots and preventing them from delivering water and nutrients to the plant. Common Causes of Root Rot: Overwatering: The leading cause of root rot in houseplants. When soil stays wet too long, roots cannot access oxygen and begin to decay. Poor drainage: Pots without drainage holes or soils that retain too much water create the perfect environment for rot. Contaminated soil: Using previously infected soil can transfer fungal spores to healthy plants. Improper container choice: Large pots hold more water than needed for small root systems, increasing the risk of waterlogging. Recognizing the Symptoms Early Because root rot begins underground, by the time the symptoms appear above the soil, the damage is often already severe. However, early intervention can still make a difference. Watch for These Warning Signs: Yellowing leaves: Often the first sign, especially if leaves begin to wilt while the soil still feels wet. Leaf drop: A plant shedding healthy-looking leaves may be suffering from water stress below the soil. Stunted growth: An otherwise healthy plant that suddenly stops growing or producing new leaves. Mushy or black roots: When removed from the pot, healthy roots should be firm and white. Rotten roots are soft, dark, and may have a foul smell. Soil that stays saturated: Soil that remains wet for more than a couple days after watering is a red flag, especially in winter months. Steps to Save a Plant with Root Rot If you suspect your indoor plant has root rot, don’t panic! Depending on the extent of the damage, it may still be saved. Prompt action gives your plant the best chance of recovery. Step-by-Step Treatment: Remove the plant from its pot: Carefully slide the plant out and gently shake off the damp soil. Do this over newspaper or a sink for easy cleanup. Trim the affected roots: With sterilized scissors or pruners, remove all mushy, blackened, or foul-smelling roots. Try to leave only healthy, firm, white roots behind. Let the plant air dry: Allow the roots to dry for several hours in a shaded, well-ventilated area. This helps prevent further fungal spread. Repot with fresh soil: Choose a clean pot with good drainage and fill it with a fresh, well-draining potting mix (like cactus mix or one amended with perlite). Water mindfully: Water only when the top 1–2 inches of soil are dry to the touch. Stick your finger into the soil to check before watering. Monitor recovery: Over the next few weeks, watch closely for new growth. Keep your plant in bright, indirect light and avoid fertilizing until it rebounds. Preventing Root Rot in Indoor Plants Prevention is always the best cure. Keeping your plant care and soil management practices in check will greatly reduce the chance of root rot becoming an issue in the first place. Helpful Prevention Tips: Choose the right pot: Always use pots with drainage holes. This allows excess water to escape and prevents soggy soil buildup. Let the soil dry: Overwatering is a common beginner mistake. Always assess the soil before watering—even moisture-loving plants like peace lilies or ferns benefit from brief dry periods. Use quality potting mix: Invest in a potting mix designed for your specific plant type. Consider mixing in sand, orchid bark, or perlite to improve drainage. Water based on season: Most houseplants require less water in the winter when growth slows. Adjust your habits with the seasons. Keep pots clean: When repotting, always wash old pots in hot, soapy water or disinfect them with a bleach solution to kill residual pathogens. Recovery Advice: Support After Saving a Plant After treatment, plants need time and care to bounce back from root rot. Don’t be discouraged if recovery is slow—what’s important is supporting your plant through this healing phase. Supportive Care Includes: Reducing light stress: Place the plant in bright but indirect sunlight while it regains strength. Too much direct light can stress the plant further. Holding off on fertilizer: Avoid fertilizing for at least a month so the roots aren’t overwhelmed before they can reestablish. Quarantining the plant: Keep it separate from other houseplants until you’re sure it’s healthy, especially if fungus was involved. Monitoring soil habits: Going forward, track how quickly your new potting mix dries out so you can adjust your watering routine accordingly. Plants That Are Most Prone to Root Rot Some indoor plants are naturally more sensitive to overwatering and poor soil conditions. Knowing which of your plants are more vulnerable can help you apply extra care. Snake Plants (Sansevieria): These succulents require infrequent watering and are easily harmed by soggy soil. ZZ Plants: Hardy but prone to rot if overwatered. Pothos: Generally resistant, but can decline rapidly if sitting in waterlogged soil. Fiddle Leaf Fig: Sensitive to both under- and overwatering, making it a trickier plant to manage. Conclusion: Root Rot Doesn’t Have to Spell Disaster While root rot may seem like a death sentence for indoor plants, with early detection and the right care steps, many can be brought back to health. The key is maintaining a healthy root environment through proper watering, good soil, and ample drainage. Remember, less is often more when it comes to watering indoor plants. By tuning into your plant’s needs and watching for signs of stress, you can prevent root rot

Dealing with Root Rot in Indoor Plants Read More »